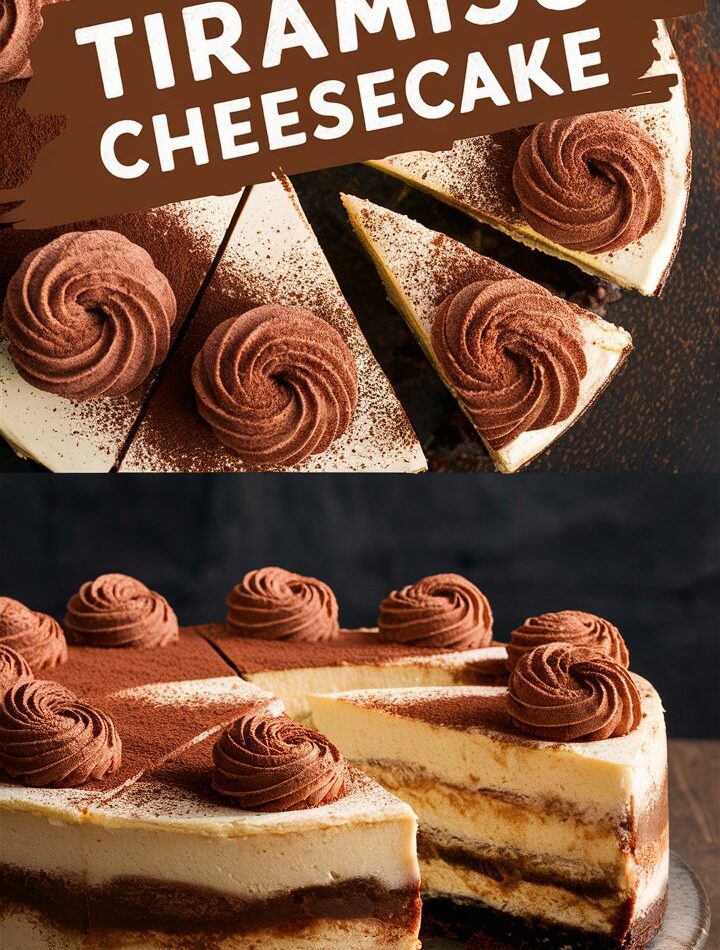
Imagine the rich creaminess of a perfectly baked cheesecake paired with the bold espresso, cocoa, and mascarpone flavors of a classic Italian tiramisu. That’s exactly what you get with Tiramisu Cheesecake—a dessert fusion that’s indulgent, elegant, and irresistibly delicious.
This guide covers two incredible versions—a baked cheesecake for a more traditional, dense texture, and a no-bake cheesecake for those who want a lighter, mousse-like consistency without turning on the oven. Whether you’re preparing for a dinner party, a holiday gathering, or simply treating yourself, this recipe offers the flexibility to match your schedule, taste preferences, and baking skill level.
Why You’ll Love Tiramisu Cheesecake
- Two desserts in one – The sophistication of tiramisu meets the comforting richness of cheesecake.
- Perfect for coffee lovers – The espresso-soaked layers create a deep, aromatic flavor.
- Customizable – Make it baked for a dense, New York–style texture or no-bake for a lighter, creamier finish.
- Make-ahead friendly – Both versions taste even better the next day, making them ideal for entertaining.
- Eye-catching presentation – The cocoa dusting and ladyfinger garnish make it look like it came from a high-end bakery.
Baked Tiramisu Cheesecake Recipe
Ingredients
For the Crust
- 1 ½ cups graham cracker crumbs (or digestive biscuits, finely crushed)
- ¼ cup granulated sugar
- ½ cup unsalted butter, melted
For the Cheesecake Filling
- 24 oz (680g) cream cheese, softened
- 8 oz (225g) mascarpone cheese, softened
- 1 cup granulated sugar
- 4 large eggs, room temperature
- ¼ cup heavy cream
- 1 tbsp pure vanilla extract
- 1 tbsp espresso powder dissolved in 2 tbsp hot water
For the Tiramisu Layer
- 1 cup strong brewed espresso or coffee, cooled
- 1 tbsp coffee liqueur (optional)
- 15–18 ladyfinger biscuits
- Unsweetened cocoa powder, for dusting
Step-by-Step Instructions
1. Prepare the Crust
- Preheat your oven to 325°F (163°C).
- Mix graham cracker crumbs, sugar, and melted butter until evenly moistened.
- Press the mixture firmly into the bottom of a 9-inch springform pan.
- Bake for 8–10 minutes, then cool while you prepare the filling.
Pro Tip: For extra flavor, mix a teaspoon of espresso powder into the crust mixture.
2. Make the Cheesecake Filling
- In a large mixing bowl, beat cream cheese and mascarpone until smooth and lump-free.
- Add sugar and mix until fully incorporated.
- Beat in eggs one at a time, mixing on low to avoid overbeating.
- Stir in heavy cream, vanilla extract, and dissolved espresso.
Pro Tip: Overmixing can incorporate too much air, leading to cracks—mix just until smooth.
3. Assemble and Bake
- Pour the filling over the cooled crust, smoothing the surface.
- Bake for 45–50 minutes, or until the center is just set but still slightly jiggles.
- Turn off the oven, crack the door open, and let cheesecake cool for 1 hour before refrigerating.
4. Add the Tiramisu Layer
- In a shallow dish, combine cooled espresso and coffee liqueur.
- Dip each ladyfinger for 1–2 seconds (don’t soak), and arrange in a single layer over the chilled cheesecake.
- Dust generously with cocoa powder.
5. Chill and Serve
Refrigerate for at least 4 hours (overnight for best results). Slice with a warm knife for clean edges, and serve chilled.
No-Bake Tiramisu Cheesecake Recipe
Ingredients
For the Crust
- 1 ½ cups graham cracker crumbs
- ¼ cup granulated sugar
- ¼ cup unsalted butter, melted
For the Filling
- 8 oz (225g) cream cheese, softened
- 8 oz (225g) mascarpone cheese, softened
- ½ cup powdered sugar
- 1 cup heavy whipping cream
- 1 tsp vanilla extract
- 1 tbsp coffee liqueur (optional)
- ½ cup brewed espresso, cooled
Instructions
- Combine crust ingredients, press into springform pan, and refrigerate.
- Beat cream cheese, mascarpone, and powdered sugar until smooth.
- In another bowl, whip heavy cream and vanilla to stiff peaks.
- Fold whipped cream into the cheese mixture.
- Stir in espresso and coffee liqueur.
- Pour filling over crust, smooth the top, and refrigerate for 4+ hours.
- Before serving, dust with cocoa powder and garnish with chocolate shavings or ladyfingers.
Ingredient Notes & Substitutions
- Mascarpone cheese – Provides authentic tiramisu flavor; substitute with cream cheese for a budget-friendly option.
- Ladyfingers – Use crisp, store-bought ones for the best structure; sponge cake strips can work in a pinch.
- Coffee liqueur – Kahlúa or Tia Maria adds depth, but you can skip it for a family-friendly version.
- Gluten-free crust – Use gluten-free graham crackers or almond flour.
- Vegan option – Swap in dairy-free cream cheese, coconut cream, and vegan ladyfingers.
Serving Suggestions
- Pair with a dusting of cinnamon for a warm twist.
- Serve with chocolate curls and a drizzle of caramel.
- Garnish with chocolate-covered espresso beans for extra flair.
- Perfect with cappuccino, espresso martinis, or dessert wine.
Storage & Freezing
- Refrigerator – Store in an airtight container for 3–4 days.
- Freezer – Wrap slices individually and freeze up to 2 months; thaw overnight in the fridge.
FAQs
Q1: Can I make this ahead of time?
Yes—both versions are best made the day before serving.
Q2: How do I prevent cracks in the baked version?
Avoid overbaking, mix on low speed, and let it cool gradually.
Q3: Can I use instant coffee?
Yes, dissolve 1 tbsp instant coffee in 2 tbsp hot water as a substitute for espresso.
Nutritional Information (per slice, baked version – approx.)
- Calories: 410
- Fat: 26g
- Carbohydrates: 35g
- Protein: 7g
- Sugar: 24g
Conclusion
Tiramisu Cheesecake is more than just a dessert—it’s an experience. Whether you choose the classic baked approach for a dense, New York–style cheesecake or the no-bake method for a lighter, mousse-like finish, you’re guaranteed a show-stopping treat. Its blend of creamy texture, coffee-kissed layers, and cocoa finish makes it perfect for celebrations, date nights, or cozy weekend indulgences.