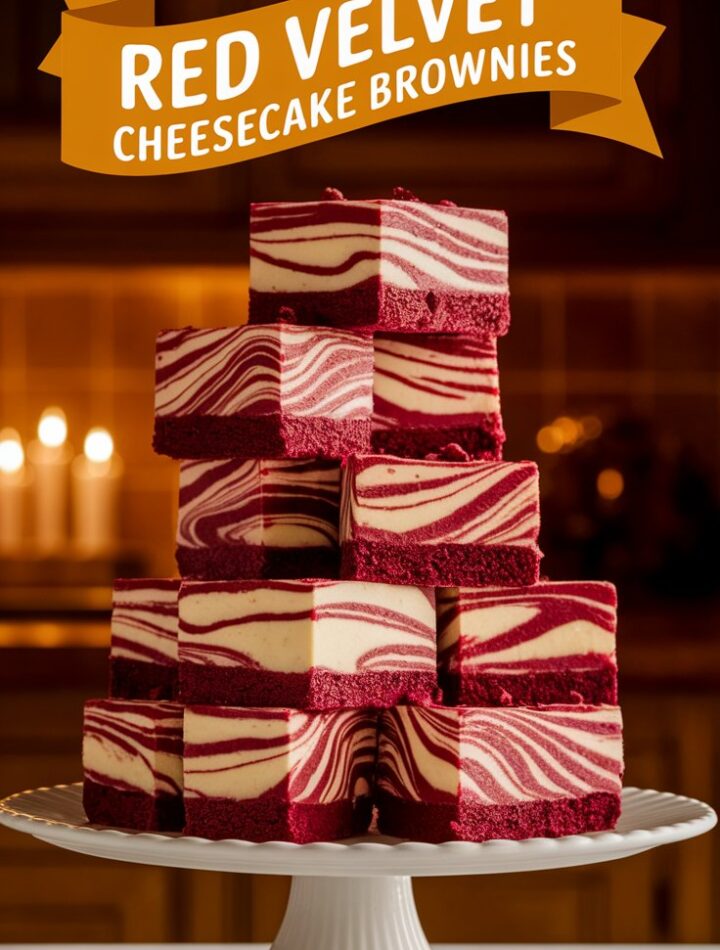
When it comes to desserts that make people stop in their tracks, Red Velvet Cheesecake Brownies are always a showstopper. Imagine the fudgy richness of a brownie, the classic cocoa flavor of red velvet cake, and the velvety creaminess of cheesecake—all swirled together in a single, beautiful bar. These brownies aren’t just delicious; they’re visually stunning, perfect for holidays, birthdays, dinner parties, or those cozy evenings when you simply crave something indulgent.
In this complete guide, we’ll cover everything you need to know about making these brownies: from the history of red velvet to detailed step-by-step instructions, expert baking tips, creative variations, storage hacks, serving ideas, nutritional insights, FAQs, and more. By the end, you’ll feel confident enough to bake the best version of Red Velvet Cheesecake Brownies that will rival any bakery.
What Are Red Velvet Cheesecake Brownies?
Before diving into the recipe, let’s break it down:
- Red Velvet: Known for its striking red hue and subtle cocoa flavor, red velvet cake originated in the early 1900s. It gained popularity for its soft, tender crumb and distinctive tang from buttermilk and vinegar. The red coloring makes it especially popular for Valentine’s Day and Christmas.
- Brownies: Fudgy, chewy, and chocolatey squares beloved by all. Brownies balance richness with a dense, moist texture.
- Cheesecake: Creamy, tangy, and smooth, cheesecake provides a luscious contrast to richer bases like brownies or cakes.
By swirling cheesecake into red velvet brownies, you get the best of all three desserts—a layered, marbled bar with fudgy chocolate undertones, a creamy cheesecake center, and the iconic look of red velvet.
Why You’ll Love This Recipe
If you’re wondering whether these brownies are worth your time, here are reasons why this recipe deserves a spot in your baking routine:
- Two Desserts in One: Cheesecake + brownies = pure indulgence.
- Beautiful Presentation: The red and white swirl is festive and elegant.
- Crowd-Pleaser: These brownies appeal to both cheesecake lovers and chocolate fans.
- Easy to Make: No special equipment is needed—just one pan.
- Perfect for Any Occasion: Birthdays, Valentine’s, Christmas, potlucks, bake sales, or just a weekend treat.
- Customizable: Add nuts, chocolate chips, or even frosting for extra flair.
Ingredients Breakdown
One of the secrets to perfect brownies is understanding why each ingredient matters. Here’s the breakdown:
For the Red Velvet Brownie Base:
- All-Purpose Flour (1 cup): Provides structure without making the brownies dry.
- Unsweetened Cocoa Powder (¼ cup): Adds subtle chocolate depth; not as strong as regular brownies but enough for balance.
- Baking Powder (½ tsp): Gives a slight lift to avoid overly dense brownies.
- Salt (¼ tsp): Enhances overall flavor.
- Unsalted Butter (½ cup, melted): The fat source for richness and fudginess.
- Granulated Sugar (1 cup): Sweetens and helps create a tender crumb.
- Eggs (2 large): Bind ingredients and add structure.
- Vanilla Extract (1 tsp): Adds warmth and enhances cocoa flavor.
- Red Food Coloring (1 tbsp): Creates the signature red velvet hue. Gel food coloring works best for vibrancy.
- White Vinegar (½ tsp): Balances flavor and reacts with cocoa for the traditional red velvet tang.
For the Cheesecake Swirl:
- Cream Cheese (8 oz, softened): The star of the swirl—use full-fat for the creamiest texture.
- Granulated Sugar (¼ cup): Sweetens the cheesecake layer.
- Egg (1 large): Provides structure and helps the cheesecake set.
- Vanilla Extract (½ tsp–1 tsp): Enhances creaminess and adds flavor.
Ingredient Substitutions:
- Gluten-Free Option: Replace all-purpose flour with a gluten-free flour blend.
- Dairy-Free Option: Use vegan cream cheese and dairy-free butter.
- Natural Coloring: Beetroot powder or natural red food dye instead of artificial coloring.
- Sugar Alternatives: Swap with coconut sugar or a sugar substitute if desired.
Step-by-Step Instructions
Follow these steps carefully for flawless brownies:
- Preheat Oven: Set your oven to 350°F (175°C). Line an 8×8-inch baking pan with parchment paper for easy removal.
- Mix Dry Ingredients: In a medium bowl, whisk together flour, cocoa powder, baking powder, and salt. Set aside.
- Prepare Wet Ingredients: In a large mixing bowl, combine melted butter and sugar until smooth. Add eggs, vanilla, food coloring, and vinegar. Mix well.
- Combine Wet & Dry: Gradually fold the dry mixture into the wet until just combined. Avoid overmixing.
- Make Cheesecake Layer: In another bowl, beat cream cheese, sugar, egg, and vanilla until smooth and lump-free.
- Layer & Swirl: Spread half the red velvet batter in the pan. Dollop cheesecake mixture over it. Add the remaining red velvet batter on top in spoonfuls. Use a knife or skewer to gently swirl.
- Bake: Bake for 35–40 minutes, or until a toothpick inserted in the center comes out with a few moist crumbs. Avoid overbaking.
- Cool Completely: Allow brownies to cool fully in the pan before slicing. This ensures clean cuts and a set cheesecake layer.
Pro Baking Tips for Success
- Use Room Temperature Ingredients: This prevents lumps in the cheesecake layer.
- Don’t Overmix Batter: Overmixing makes brownies tough. Fold ingredients gently.
- Swirl Smartly: Don’t over-swirl, or the layers will blend instead of marbling.
- Check Early: Start checking brownies at 30 minutes—every oven varies.
- Chill Before Cutting: Refrigerate brownies for 1–2 hours for neat, bakery-style slices.
- Sharp Knife Trick: Wipe your knife clean between cuts for sharp edges.
Variations & Flavor Twists
- Nutty Crunch: Add ½ cup chopped pecans or walnuts to the brownie layer.
- Chocolate Chip Boost: Mix in white, milk, or dark chocolate chips.
- Festive Version: Add sprinkles on top for birthdays or holidays.
- Frosted Delight: Spread cream cheese frosting after cooling for extra indulgence.
- Mini Brownie Bites: Bake in muffin tins for individual servings.
- Vegan Twist: Use flax eggs and dairy-free cream cheese.
Serving Suggestions
These brownies are versatile and can be served in many creative ways:
- With a dusting of powdered sugar for elegance.
- Warmed slightly and topped with a scoop of vanilla ice cream.
- Served with fresh berries for a tart contrast.
- Drizzled with chocolate or caramel sauce.
- Paired with a cup of coffee or hot cocoa.
- On a festive dessert platter alongside cookies and truffles.
Storage, Freezing & Reheating
- Room Temperature: Store in an airtight container up to 2 days.
- Refrigerator: Keeps well for up to 5 days.
- Freezer: Wrap brownies tightly in plastic wrap, then foil. Freeze up to 3 months. Thaw overnight in the fridge.
- Reheating: Microwave individual brownies for 10–15 seconds, but don’t overheat or the cheesecake may separate.
Nutritional Insights (per serving, approx.)
- Calories: 210
- Fat: 12g
- Carbohydrates: 24g
- Protein: 3g
- Fiber: 1g
- Sugar: 17g
(Values vary based on substitutions and portion size.)
FAQs
1. Can I use a boxed red velvet mix?
Yes, but homemade offers better texture and flavor.
2. Do I need food coloring?
For the classic look, yes. But you can skip it for a cocoa-cream swirl version.
3. Can I make this gluten-free?
Yes, just use a 1:1 gluten-free flour blend.
4. Can I double the recipe?
Yes, use a 9×13-inch pan and increase baking time by 10–15 minutes.
5. Can I add frosting?
Definitely. Cream cheese frosting is perfect for added indulgence.
6. Can I freeze these?
Yes, they freeze beautifully. Wrap tightly before freezing.
7. Why did my cheesecake crack?
Overbaking or sudden temperature changes can cause cracks. Chill to smooth them.
8. How do I cut neat squares?
Chill fully, use a sharp knife, and clean between slices.
9. Are they very sweet?
They’re balanced, but you can reduce sugar slightly if you prefer.
10. Can I make them dairy-free?
Yes, with dairy-free butter and vegan cream cheese.
11. What occasions are best for serving these?
Valentine’s, Christmas, potlucks, birthdays, or as a special after-dinner dessert.
12. Can I use natural coloring instead?
Yes, beet powder works well.
Common Mistakes & How to Avoid Them
- Overbaking: Leads to dry brownies. Always check early.
- Skipping Cooling Time: Causes messy cuts. Patience pays off.
- Not Using Full-Fat Cream Cheese: Low-fat versions may turn grainy.
- Too Much Swirling: Can muddy the design. Less is more.
Why This Recipe Works
- Balanced sweetness between brownie and cheesecake.
- Fudgy texture with creamy swirls.
- Simple method with guaranteed results.
- Visually appealing and versatile.
- Adaptable for dietary needs and occasions.
Conclusion
Red Velvet Cheesecake Brownies are more than just a dessert—they’re an experience. With their gorgeous marbled look, rich flavor, and creamy texture, they’re guaranteed to impress guests and satisfy cravings. Whether you’re baking for a special holiday, a family gathering, or just to treat yourself, this recipe is a keeper.
So go ahead—preheat that oven, grab your mixing bowls, and create a dessert that blends elegance with indulgence. Your family, friends, and taste buds will thank you!