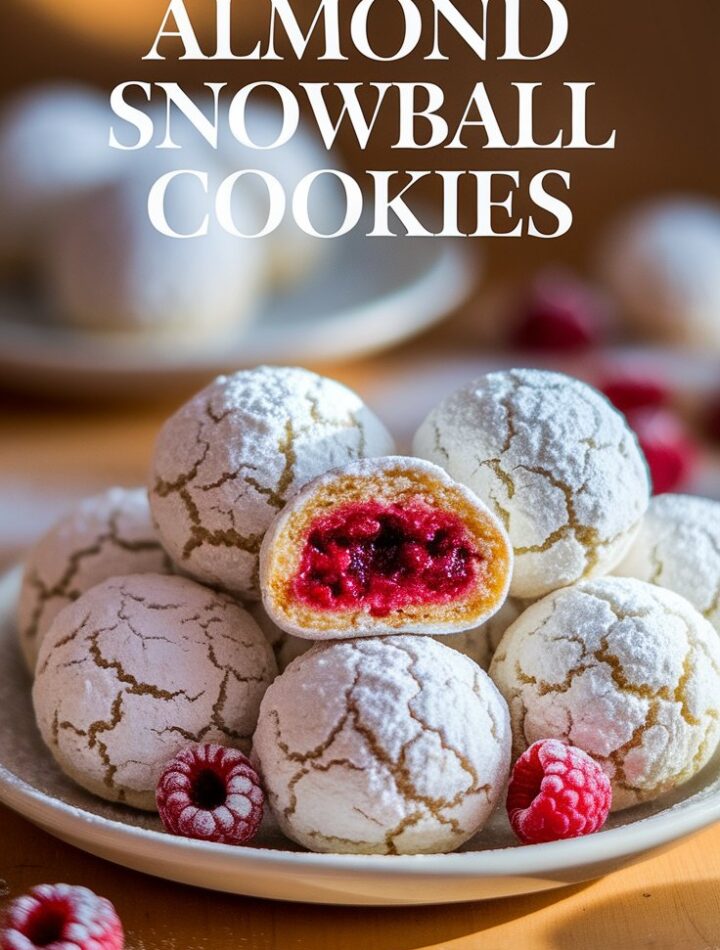
Few cookies capture the magic of the holidays and the charm of homemade baking quite like Raspberry Filled Almond Snowball Cookies. These bite-sized delights combine the buttery richness of almond shortbread with the bright, fruity tang of raspberry jam, all wrapped in a delicate snowy coating of powdered sugar. The result? A melt-in-your-mouth treat that feels festive, comforting, and elegant all at once.
Snowball cookies are beloved worldwide under different names—Russian Tea Cakes, Mexican Wedding Cookies, Italian Wedding Cookies—but this version takes them to the next level with a hidden raspberry jam center. They’re perfect for gifting, adding to cookie platters, or enjoying with a warm cup of tea.
This article will guide you through everything you need to know about Raspberry Filled Almond Snowball Cookies: ingredients, step-by-step instructions, variations, storage methods, FAQs, and expert baking tips. By the end, you’ll not only master the recipe but also understand how to adapt it to your taste and make it a family favorite.
Why You’ll Love Raspberry Filled Almond Snowball Cookies
- Flavor Fusion: Nutty almonds pair perfectly with the tart sweetness of raspberry jam.
- Beautiful Presentation: Coated in powdered sugar, these cookies look like snowballs—festive for holidays or winter gatherings.
- Easy but Impressive: Simple ingredients and straightforward steps yield bakery-quality cookies.
- Customizable: Swap out jams, nuts, or coatings for endless variations.
- Gift-Worthy: Packaged in tins or jars, they make heartfelt homemade gifts.
Ingredients for Raspberry Filled Almond Snowball Cookies
To make these cookies, you’ll need simple pantry staples along with a few special touches. Always use fresh, high-quality ingredients for the best flavor.
Core Ingredients
- 1 cup unsalted butter, softened – The base for rich, melt-in-your-mouth dough.
- ½ cup powdered sugar – Adds sweetness and contributes to the tender texture.
- 1 teaspoon vanilla extract – For warm, sweet depth.
- ½ teaspoon almond extract – Enhances the nutty flavor.
- 2 cups all-purpose flour – Provides structure.
- 1 cup finely ground almonds (almond meal) – Adds texture and nutty richness.
- ¼ teaspoon salt – Balances sweetness.
- ½ cup raspberry jam (seedless preferred) – Smooth filling with a bright flavor.
- Additional powdered sugar, for rolling – Creates the iconic snowball look.
Ingredient Notes & Substitutions
- Butter: Use real butter for best results. Margarine or shortening won’t give the same flavor.
- Flour: A gluten-free blend can be substituted for all-purpose flour if needed.
- Almond Meal: You can make your own by pulsing blanched almonds in a food processor.
- Jam: While raspberry is classic, strawberry, apricot, or blackberry jam work beautifully.
- Extracts: If you love almond flavor, you can increase almond extract slightly, but don’t overpower the cookie.
Step-by-Step Instructions
1. Prepare the Dough
- In a large mixing bowl, cream the softened butter and powdered sugar together until light and fluffy. This step is key for the tender crumb.
- Mix in the vanilla and almond extracts until combined.
2. Add Dry Ingredients
- In a separate bowl, whisk together the flour, almond meal, and salt.
- Gradually add this dry mixture to the butter-sugar base, stirring gently until a dough forms. Do not overmix—this will keep the cookies tender.
3. Shape the Cookies
- Preheat your oven to 350°F (175°C) and line a baking sheet with parchment paper.
- Roll dough into 1-inch balls and place them about 2 inches apart on the sheet.
- Using your thumb or the back of a spoon, press a small indentation into each cookie.
4. Add the Filling
- Spoon about ½ teaspoon of seedless raspberry jam into each indentation.
- Be careful not to overfill, as the jam may bubble out while baking.
5. Bake
- Bake cookies for 15–18 minutes, or until the edges are just turning golden.
- Remove from oven and let cool on the baking sheet for 5 minutes before transferring to a wire rack.
6. Coat in Powdered Sugar
- Once cooled, roll cookies in powdered sugar until fully coated.
- For an extra snowy look, roll them a second time before serving.
Tips for Success
- Softened Butter: Ensure butter is softened but not melted—too soft and the dough will spread.
- Uniform Size: Roll dough balls evenly so cookies bake consistently.
- Jam Control: Use a piping bag or small spoon for neat jam placement.
- Cooling: Allow cookies to cool before rolling in sugar; otherwise, the coating may melt.
- Double Coating: A second dusting right before serving keeps them looking fresh.
Variations to Try
One of the best parts of this recipe is its adaptability. Here are a few creative twists:
- Different Jams: Try apricot, strawberry, blueberry, or even fig preserves.
- Nut Swaps: Replace almond meal with finely ground pistachios, walnuts, or pecans.
- Chocolate Twist: Drizzle cooled cookies with melted white or dark chocolate.
- Spiced Version: Add a pinch of cinnamon or cardamom for warmth.
- Coconut Snowballs: Roll in a mixture of powdered sugar and shredded coconut.
- Nut-Free Option: Substitute almond meal with finely crushed graham crackers or oat flour.
Storage and Make-Ahead Options
Short-Term Storage
- Store cookies in an airtight container at room temperature for up to 5 days.
Freezing Instructions
- Place cookies in a single layer on a baking sheet and freeze until firm.
- Transfer to a freezer-safe container with parchment paper between layers.
- Store for up to 3 months. Thaw at room temperature before serving.
Make-Ahead Dough
- Prepare the dough, wrap tightly in plastic wrap, and refrigerate for up to 2 days before baking.
Reheating Option
- These cookies don’t require reheating, but if you prefer them slightly warm, heat in a 300°F (150°C) oven for 5 minutes.
Serving Ideas
- Holiday Platters: Mix with gingerbread, biscotti, and shortbread for a festive spread.
- Tea Time Treat: Serve alongside black tea, green tea, or coffee.
- Gift Boxes: Pack in tins with tissue paper for homemade holiday gifts.
- Dessert Boards: Pair with chocolates, dried fruit, and nuts.
Nutrition Information (per cookie, approx.)
- Calories: 120
- Fat: 7g
- Carbohydrates: 13g
- Protein: 2g
- Fiber: 1g
- Sugar: 6g
(Values will vary based on exact ingredients and jam used.)
Frequently Asked Questions (FAQs)
Can I make these cookies gluten-free?
Yes! Substitute the all-purpose flour with a gluten-free flour blend.
What kind of raspberry jam is best?
A smooth, seedless raspberry jam works best for a neat filling.
Do I need to chill the dough?
Chilling isn’t required, but if your dough feels sticky, chill it for 20–30 minutes.
Can I make them vegan?
Yes. Use plant-based butter and ensure your powdered sugar is vegan-friendly.
How do I prevent the jam from leaking?
Avoid overfilling and keep indentations shallow.
Can I double the recipe?
Absolutely. Just double the ingredients and bake in batches.
How long does the powdered sugar coating last?
The coating stays fresh for a few days but may absorb moisture over time. Roll again before serving if needed.
Expert Baking Tips
- Room Temperature Ingredients: Soft butter and room-temp extracts blend more evenly.
- Avoid Overmixing: Overworking the dough develops gluten, making cookies tough.
- Small Batch Test: Bake a small tray first to ensure jam doesn’t bubble over.
- Cool Completely Before Storing: Warm cookies can make the powdered sugar clump.
- Gift Presentation Tip: Stack cookies in parchment-lined tins with festive ribbon for a professional touch.
Conclusion
Raspberry Filled Almond Snowball Cookies are a timeless treat with a delightful twist. The buttery almond dough pairs perfectly with the sweet-tart jam filling, and the powdered sugar coating makes them look as magical as they taste. Whether you’re baking for the holidays, creating a thoughtful gift, or simply treating yourself, these cookies are sure to become a favorite in your kitchen.