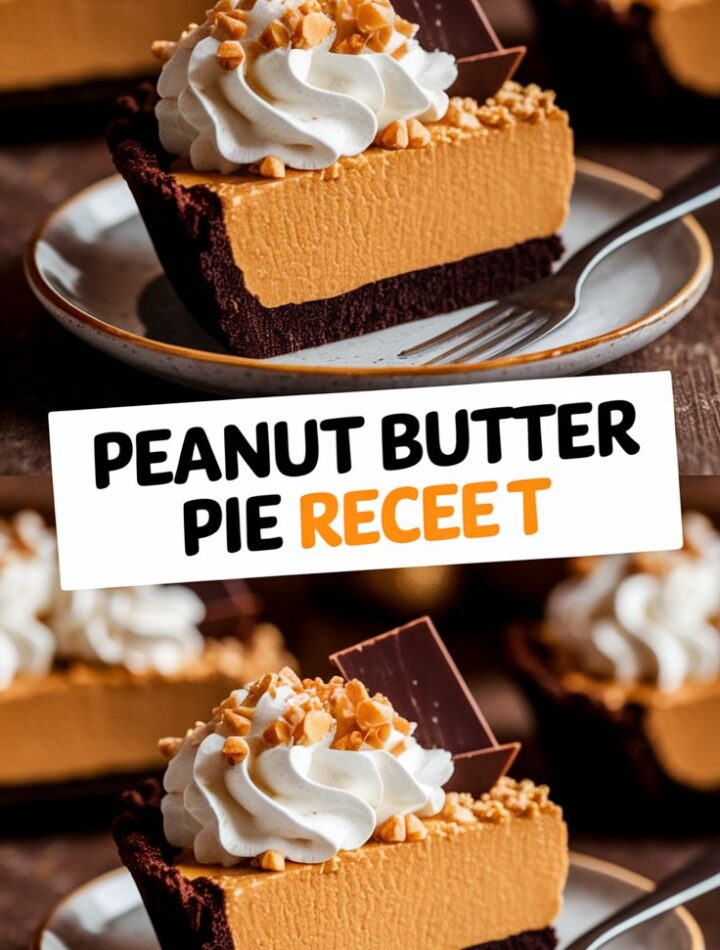
There’s something magical about the combination of peanut butter, cream cheese, and whipped cream—a trio that creates the silkiest, most satisfying pie filling imaginable. This Peanut Butter Pie recipe is a showstopper, not because it’s complicated, but because it’s deceptively easy. With its buttery graham cracker crust, fluffy filling, and optional chocolate drizzle, this dessert is pure comfort in every slice.
Whether you’re hosting a family dinner, celebrating the holidays, or just craving something sweet after a long day, this pie delivers perfection. It’s no-bake, which means you won’t need to turn on the oven, and it sets beautifully in the refrigerator—making it a perfect make-ahead treat.
If you’ve never tried making a peanut butter pie before, prepare to fall in love with this dreamy dessert that’s as rich as it is refreshing.
❤️ Why You’ll Love This Peanut Butter Pie Recipe
There are plenty of reasons why home bakers swear by this recipe—and why it’s become a go-to for gatherings and celebrations. Here’s what makes it special:
- No Baking Required: You only need to mix, chill, and enjoy. Perfect for hot days or busy evenings.
- Smooth, Creamy Texture: The filling is light yet luscious, thanks to whipped cream folded into the peanut butter base.
- Crowd-Pleasing Flavor: A beautiful balance of sweet, nutty, and slightly salty—delicious for all ages.
- Customizable: Add chocolate drizzle, a layer of ganache, or even a banana layer for variety.
- Make-Ahead Friendly: This pie actually tastes better after chilling overnight—it gives the flavors time to blend beautifully.
- Freezer Friendly: You can store leftovers in the freezer for later indulgence.
This recipe is an ideal blend of simplicity and decadence, making it one of those desserts you’ll return to time and time again.
🧈 Ingredients You’ll Need
You only need a few pantry staples to make this creamy masterpiece. Let’s break it down:
🥧 For the Graham Cracker Crust:
- 1½ cups graham cracker crumbs (about 12–14 crackers, finely crushed)
- ¼ cup granulated sugar
- ½ cup unsalted butter, melted
Tip: You can also use a pre-made crust if you’re short on time, but homemade always tastes fresher.
🥜 For the Peanut Butter Filling:
- 1 cup creamy peanut butter (smooth, not natural-style)
- 8 oz cream cheese, softened to room temperature
- 1 cup powdered sugar
- 1 cup heavy whipping cream
- 1 teaspoon vanilla extract
- ¼ teaspoon salt (balances the sweetness)
🍫 For the Topping:
- ½ cup heavy cream
- 2 tablespoons powdered sugar
- ½ cup chocolate chips or chocolate syrup (optional for drizzling)
- Chopped peanuts, Reese’s pieces, or shaved chocolate for garnish
Note: Make sure your cream cheese is softened and your peanut butter is at room temperature—this ensures the filling blends to a silky-smooth consistency.
🥄 How to Make Peanut Butter Pie (Step-by-Step Guide)
This recipe is designed for ease, flavor, and flawless texture. You’ll go from ingredients to an impressive dessert in no time.
Step 1: Prepare the Graham Cracker Crust
- In a mixing bowl, combine graham cracker crumbs and sugar.
- Pour in the melted butter and stir until the texture resembles wet sand.
- Press the mixture firmly into a 9-inch pie dish—make sure it covers the bottom and sides evenly.
- Chill in the refrigerator for at least 15 minutes to set while you prepare the filling.
Optional: For extra crunch, bake the crust at 350°F (175°C) for 8 minutes, then cool completely before filling.
Step 2: Make the Creamy Peanut Butter Filling
- In a large bowl, beat the cream cheese and peanut butter together using an electric mixer until smooth and fluffy.
- Add the powdered sugar, vanilla extract, and salt, mixing until everything is fully combined and creamy.
- In a separate bowl, whip the heavy cream until stiff peaks form.
- Gently fold the whipped cream into the peanut butter mixture. Don’t overmix—it should stay light and airy.
You’ll notice the filling becomes a dreamy, mousse-like texture that’s impossible to resist.
Step 3: Assemble the Pie
- Take your chilled crust from the refrigerator.
- Spoon the peanut butter filling into the crust and spread evenly using a spatula.
- Smooth the top, ensuring there are no air pockets.
- Cover the pie with plastic wrap and refrigerate for at least 4 hours, or preferably overnight, for best texture and flavor.
Step 4: Add the Whipped Cream Topping
- Whip the ½ cup heavy cream with 2 tablespoons powdered sugar until fluffy.
- Gently spread or pipe over the chilled pie.
- Add your favorite toppings—chocolate drizzle, chopped peanuts, or peanut butter cups make it extra indulgent.
Step 5: Chill and Serve
Refrigerate the pie again for at least 30 minutes before slicing. Serve cold and watch as it disappears slice by slice!
🍫 Optional Add-Ons & Flavor Variations
One of the best things about this recipe is its flexibility. You can tailor it to your taste or occasion.
🍌 1. Peanut Butter & Banana Pie
Layer thin banana slices between the crust and peanut butter filling. The combination is creamy, nostalgic, and perfect for brunches.
🍪 2. Oreo Peanut Butter Pie
Replace the graham cracker crust with an Oreo crust—simply crush 25 Oreos and mix with ¼ cup melted butter. This adds a chocolatey richness.
🍫 3. Chocolate Lover’s Dream
Add a layer of chocolate ganache before adding the filling, or drizzle melted dark chocolate over the top.
🥥 4. Coconut Peanut Butter Pie
Fold shredded coconut into the filling or top with toasted coconut flakes for a tropical twist.
🧂 5. Salted Caramel Peanut Butter Pie
Drizzle salted caramel sauce between the layers or on top for a sweet-salty delight.
🧊 Storage and Make-Ahead Tips
- Refrigerator: Store covered for up to 4 days.
- Freezer: Freeze the entire pie (wrapped tightly) for up to 2 months.
- Serving Tip: Let it thaw in the fridge overnight before serving.
Note: Never leave the pie at room temperature for more than 2 hours—dairy ingredients need refrigeration.
🍽️ Serving Suggestions
This creamy dessert pairs wonderfully with:
- Hot coffee or iced lattes
- Vanilla ice cream on the side
- Chilled chocolate milk for a nostalgic pairing
- A sprinkle of sea salt flakes for contrast
You can also make mini versions in cupcake liners for parties or picnics.
🥣 Expert Tips for a Perfect Peanut Butter Pie
- Use smooth peanut butter. Natural types can separate and cause a gritty texture.
- Whip the cream properly. Overbeaten cream becomes grainy; underbeaten makes the filling too soft.
- Chill overnight. This enhances structure and flavor balance.
- Avoid overmixing. Once you fold in whipped cream, mix gently to keep it fluffy.
- Add salt. A pinch of salt elevates the peanut flavor beautifully.
❓ FAQs (Frequently Asked Questions)
1. Can I use crunchy peanut butter instead of creamy?
Yes! Crunchy peanut butter will add texture, though the filling will be slightly denser.
2. Can I make it dairy-free?
Yes—use dairy-free cream cheese, coconut whipped cream, and vegan butter for the crust.
3. Can I make it sugar-free?
Substitute powdered sugar with a low-carb sweetener like erythritol or monk fruit powder.
4. Can I freeze the pie after assembling it?
Absolutely. Wrap tightly with plastic wrap and foil before freezing for up to 2 months.
5. How do I prevent a soggy crust?
If your crust is homemade, bake it for 8 minutes before chilling—it helps it firm up.
6. Can I use Cool Whip instead of fresh whipped cream?
Yes, but fresh whipped cream gives a lighter, more natural taste.
7. How do I know when it’s set?
The filling should be firm to touch and slice cleanly—it usually takes at least 4 hours of chilling.
🧮 Estimated Nutrition (Per Slice)
| Nutrient | Amount |
|---|---|
| Calories | 420 kcal |
| Fat | 28 g |
| Carbohydrates | 30 g |
| Protein | 8 g |
| Sugar | 22 g |
| Sodium | 180 mg |
Note: Nutritional values are approximate and may vary based on specific brands or toppings.
🌟 Why This Recipe Outperforms the Rest
Unlike many versions found online, this recipe prioritizes:
- Perfect balance between sweet and salty.
- Stable filling that doesn’t collapse after chilling.
- No artificial taste—every bite is creamy, fresh, and authentic.
- Flexible customization for every dietary preference.
It’s designed to be foolproof for beginners yet impressive enough for professionals.
✨ Serving Occasions & Presentation Ideas
- Thanksgiving Dinner: Serve chilled after a savory meal—it’s a refreshing, nutty contrast.
- Birthday Treats: Decorate with whipped cream swirls and peanut butter cups.
- Holiday Dessert Table: Pair it with chocolate mousse or caramel pudding.
- Summer Picnics: Make it in individual mason jars for portable mini pies.
Presentation matters—finish with a drizzle of melted chocolate, a dusting of cocoa powder, or even a sprinkle of crushed graham crackers for a bakery-style look.
🧡 Conclusion: A Pie Worth Every Bite
This Peanut Butter Pie Recipe is proof that great desserts don’t need to be complicated. With minimal effort and simple ingredients, you get a silky-smooth, flavor-packed pie that wins hearts every time. It’s no-bake, no-stress, and endlessly adaptable.
Serve it at family gatherings, bring it to potlucks, or keep it in your fridge for those moments when you just need a creamy, peanut buttery bite of joy.