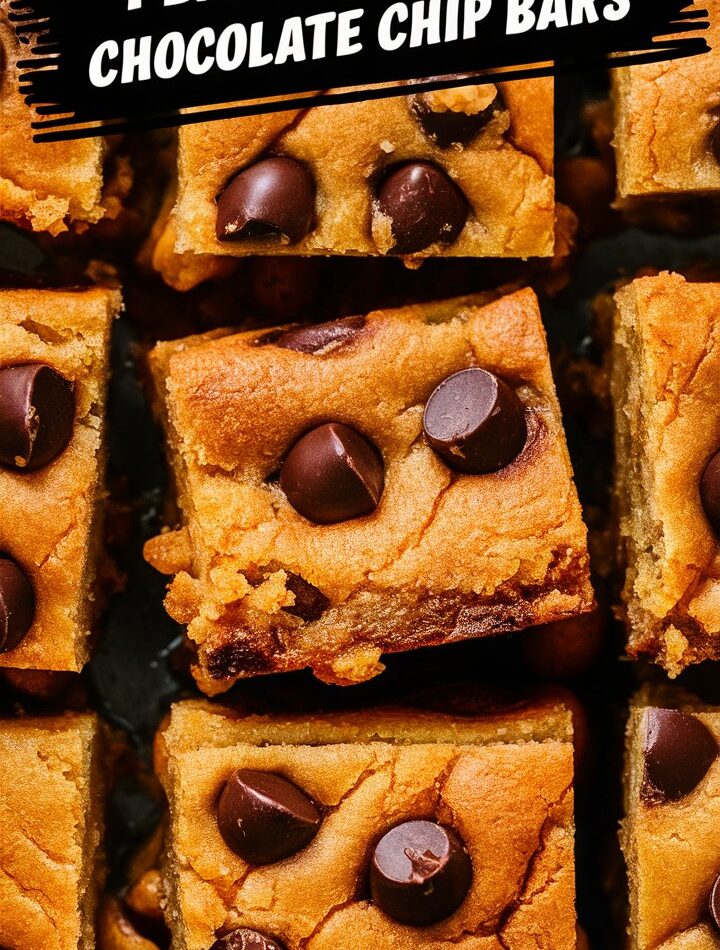
Peanut butter chocolate chip bars are more than just a dessert—they’re a comforting blend of nostalgic flavors, crowd-pleasing texture, and pure indulgence. Whether you’re making treats for a birthday party, potluck, bake sale, or just your evening tea time, these bars never fail to impress. They strike the perfect balance between chewy and soft, sweet and salty, rich and simple. With layers of flavor and texture in every bite, this recipe is bound to become a staple in your kitchen.
In this comprehensive guide, we’ll walk you through everything you need to know about these bars—from the science behind the chewiness, ingredient substitutions, flavor variations, tips for baking success, gluten-free options, freezing instructions, and much more. Stick around to discover how to take your homemade dessert game to gourmet levels without complicated techniques or hard-to-find ingredients.
Why You’ll Fall in Love With These Bars
There are dozens of dessert bar recipes out there, but this one stands out for several reasons:
- One-Bowl Simplicity: All ingredients can be combined in a single bowl, minimizing cleanup.
- Fast and Easy: Prep takes just 10–15 minutes; total baking time is under 30 minutes.
- Customizable: Use mix-ins like M&Ms, pretzels, toffee, or nuts to make it your own.
- Crowd-Friendly: These bars can be sliced into 16 or 24 servings—great for sharing.
- Freezer-Friendly: Make a batch ahead of time and freeze for quick treats later.
The Perfect Ingredient Lineup
Here’s everything you’ll need for the ultimate peanut butter chocolate chip bars. We’ve also included pro tips for each component to help you elevate the flavor.
Base Ingredients
- 1 cup creamy peanut butter
Tip: Use a shelf-stable brand like Jif or Skippy for consistent texture. Natural peanut butter can separate and lead to greasy or crumbly bars. - ½ cup unsalted butter, melted
Tip: Melting the butter gives the bars a fudgier texture. - 1 cup packed light brown sugar
Tip: Brown sugar adds moisture and enhances chewiness thanks to the molasses content. - ½ cup granulated sugar
Tip: Creates a balanced sweetness and helps with structure. - 2 large eggs
Tip: Use room temperature eggs for better blending and rise. - 1½ tsp vanilla extract
Tip: Always opt for pure vanilla extract for best flavor.
Dry Ingredients
- 1½ cups all-purpose flour
Tip: Spoon and level the flour when measuring to avoid a dry dough. - ½ tsp baking powder
Tip: Provides lift without making the bars cakey. - ½ tsp salt
Tip: Balances the sweetness and enhances the peanut butter flavor.
Mix-Ins
- 1¼ cups semisweet chocolate chips (divided)
Tip: Fold 1 cup into the batter and sprinkle the remaining on top for a gooey finish.
How to Make Peanut Butter Chocolate Chip Bars: Step-by-Step
Step 1: Preheat & Prepare
Preheat your oven to 350°F (175°C). Line a 9×13-inch pan with parchment paper or grease lightly with cooking spray. Leave parchment overhang for easy lifting later.
Step 2: Mix the Wet Ingredients
In a large mixing bowl, whisk together the melted butter, peanut butter, brown sugar, and granulated sugar until smooth. Add the eggs one at a time, mixing well after each. Stir in the vanilla extract.
Step 3: Add the Dry Ingredients
In a separate bowl, combine flour, baking powder, and salt. Gradually add to the wet mixture, stirring until just combined. Avoid overmixing to maintain a soft texture.
Step 4: Fold in the Chocolate Chips
Fold in 1 cup of the chocolate chips using a rubber spatula or wooden spoon.
Step 5: Spread & Top
Evenly spread the batter into your prepared pan. Sprinkle the remaining ¼ cup of chocolate chips over the top.
Step 6: Bake to Perfection
Bake for 23–27 minutes or until edges are golden and the center is just set. For fudgier bars, slightly underbake—the bars will firm up as they cool.
Step 7: Cool & Slice
Allow to cool completely in the pan. Use the parchment overhang to lift the bars out, then cut into desired sizes (16 large squares or 24 smaller ones).
Expert Baking Tips for the Best Results
- Room Temperature Ingredients: Always use room temperature eggs and butter for a smoother, more uniform batter.
- Don’t Overmix: Overmixing the batter can lead to tough, dry bars. Mix until just combined.
- Check for Doneness: The center should be slightly soft. Overbaking will make the bars cakier than chewy.
- Use Parchment Paper: This makes it easy to lift and slice the bars cleanly.
- Let Cool Before Slicing: Slicing warm bars can result in a gooey mess. Allow to set fully before cutting.
Creative Variations to Try
Want to mix things up? Here are a few irresistible variations:
1. Swirl-Top Peanut Butter Bars
Drop spoonfuls of peanut butter on top of the batter and swirl gently before baking for a marbled look and deeper flavor.
2. Chocolate Lovers’ Version
Add 2 tbsp of cocoa powder to the flour mix and use chocolate chunks instead of chips for a brownie-bar hybrid.
3. Salty Crunch
Add crushed pretzels, roasted peanuts, or sprinkle flaky sea salt over the top for contrast.
4. Festive Holiday Bars
Mix in red and green M&Ms for Christmas, pastel candies for Easter, or candy corn for Halloween.
5. Healthier Option
Replace half the butter with mashed banana or unsweetened applesauce, and use coconut sugar instead of brown sugar.
Making It Gluten-Free
To make this recipe gluten-free:
- Substitute all-purpose flour with a 1:1 gluten-free baking blend (e.g., Bob’s Red Mill or King Arthur).
- Ensure your chocolate chips and peanut butter are certified gluten-free.
- Check baking powder and vanilla for hidden gluten additives.
The texture may be slightly softer, but the flavor remains rich and satisfying.
How to Store & Freeze
Room Temperature:
Store in an airtight container at room temperature for up to 5 days. Place parchment between layers if stacking.
Refrigeration:
For extended freshness, refrigerate for up to 10 days, but bring to room temp before serving for best texture.
Freezing:
Wrap bars individually in plastic wrap and place them in a freezer-safe bag. Freeze for up to 2 months. Thaw at room temperature or microwave for 10–15 seconds.
Serving Suggestions
- Warm with Ice Cream: Serve warm bars with a scoop of vanilla ice cream and a drizzle of chocolate or caramel sauce.
- Bar Box Gift: Package in cellophane with a ribbon for a sweet homemade gift.
- On-the-Go Treats: Wrap individually and include in lunch boxes, hiking trips, or picnics.
FAQs: Everything You Need to Know
Q1: Can I use natural peanut butter?
Natural peanut butter tends to separate and can make the bars oily. Use a no-stir variety like Jif for best texture.
Q2: Can I make this recipe dairy-free?
Yes! Use a plant-based butter and dairy-free chocolate chips. Most shelf-stable peanut butters are already dairy-free.
Q3: Why did my bars turn out cakey?
This can happen if the batter was overmixed or overbaked. Reduce baking time slightly and don’t beat the eggs too vigorously.
Q4: Can I double this recipe?
Absolutely. Use two 9×13 pans or a half-sheet pan and bake in batches.
Q5: Can I prepare the dough in advance?
Yes. Make the dough up to 48 hours ahead and store covered in the refrigerator. Let sit at room temp for 20 minutes before baking.
Nutritional Info (Per Bar)
Note: Based on 24 servings. Nutritional values may vary.
- Calories: 230
- Fat: 12g
- Carbs: 28g
- Sugar: 18g
- Protein: 5g
- Fiber: 1g
- Sodium: 110mg
Final Thoughts: A Must-Have Recipe for Every Baker
Peanut butter chocolate chip bars combine the best of everything: creamy peanut butter, melty chocolate, and a soft, chewy texture that delights everyone from toddlers to grandparents. They’re simple to make, endlessly customizable, and practically fail-proof. Whether you’re baking for a special event or just a weeknight treat, these bars will always rise to the occasion.