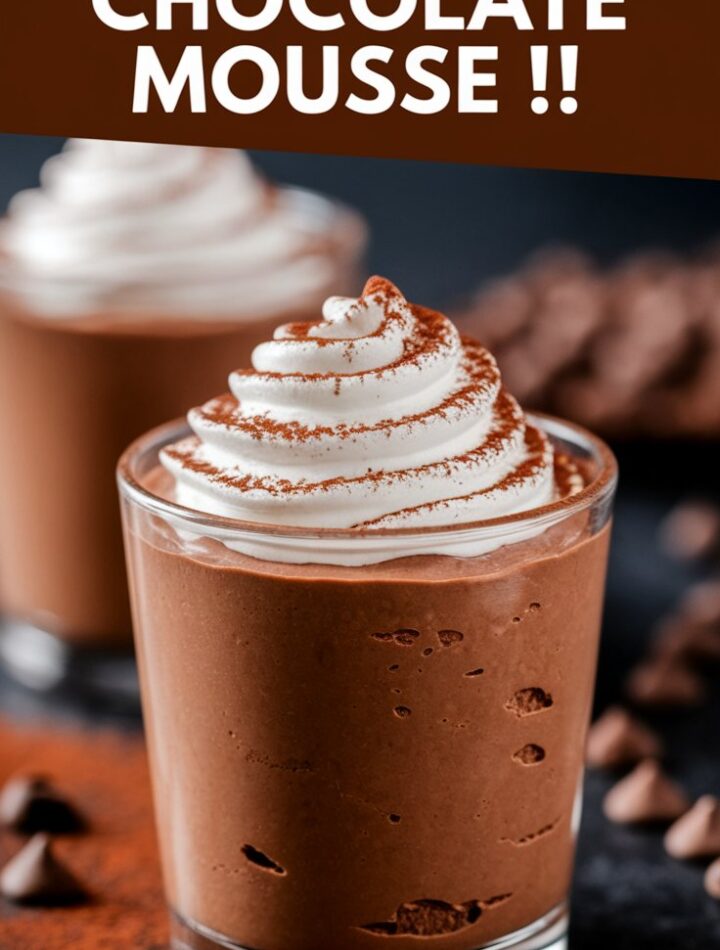
Chocolate mousse is one of those timeless desserts that instantly elevates any meal. Its luxurious texture, rich chocolate flavor, and melt-in-your-mouth creaminess have made it a classic in fine dining as well as home kitchens. But if you’re following a ketogenic or low-carb lifestyle, you may have assumed that such indulgence was off-limits.
That’s where Keto Chocolate Mousse comes in. This recipe delivers everything you love about the original—silky smoothness, deep cocoa flavor, and an airy finish—without the sugar overload. Instead, it uses high-quality unsweetened chocolate, low-carb sweeteners, and whipped cream to create a dessert that is as healthy as it is decadent.
Unlike some keto-friendly desserts that taste like a compromise, this mousse is indistinguishable from the traditional French version. In fact, many people who try it are surprised to learn that it’s sugar-free and keto-approved. Whether you’re preparing it for a dinner party, a family treat, or a self-care dessert night, this mousse will become your go-to recipe whenever chocolate cravings strike.
What Makes Keto Chocolate Mousse Different?
Before diving into the full recipe, let’s explore what sets this keto-friendly mousse apart from typical chocolate desserts:
- Uses Real Chocolate, Not Just Cocoa Powder
Many “quick keto mousses” use only cocoa powder and cream. While fast, they lack the depth and luxurious mouthfeel of real melted chocolate. This recipe incorporates unsweetened chocolate, which enhances both flavor and texture. - Balanced Sweetness Without Sugar
A blend of allulose and monk fruit extract ensures just the right amount of sweetness without aftertaste, bitterness, or crystallization issues. - Blender-Friendly and Foolproof
Traditional mousse can feel intimidating because it involves tempering eggs and carefully folding. Here, a blender does most of the work, ensuring a silky consistency with minimal effort. - Rich Yet Airy Texture
The whipped cream gives the mousse its lightness, while the melted chocolate ensures it remains rich and satisfying. - Naturally Keto-Friendly
With virtually no sugar and only a handful of carbs, this mousse fits seamlessly into a keto or low-carb lifestyle.
Ingredients for Keto Chocolate Mousse
The beauty of this recipe lies in its simplicity. With just a few carefully chosen ingredients, you can create a dessert that tastes like it belongs in a fine-dining restaurant.
Main Ingredients
- Unsweetened Chocolate (4 oz / 115 g)
Choose a high-quality chocolate bar or baking chocolate with 85–100% cocoa content. The higher the quality, the richer your mousse will taste. - Heavy Cream (1 ¼ cups / 300 ml, divided)
- ¾ cup (180 ml) for whipping into peaks.
- ½ cup (120 ml) for folding into the mousse base.
- Large Egg (1, pasteurized)
Adds richness and stability. Pasteurization reduces food safety risks, especially since the mousse isn’t baked. - Allulose Sweetener (2 tablespoons)
This natural sweetener prevents crystallization, ensuring your mousse stays smooth. - Monk Fruit Extract (½ teaspoon, optional)
Enhances sweetness without adding carbs or bitterness. - Vanilla Extract (½ teaspoon)
Provides warmth and balance to the chocolate. - Pinch of Salt
Essential for deepening the cocoa flavor.
Garnish Options
- Whipped cream
- Shaved dark chocolate (sugar-free)
- Fresh raspberries or strawberries
- Toasted nuts (almonds, hazelnuts, or pecans)
- A dusting of unsweetened cocoa powder
Step-by-Step Instructions
Making mousse can seem daunting, but this version simplifies the process without compromising on quality.
Step 1: Melt the Chocolate
- Place the chopped unsweetened chocolate in a heatproof bowl.
- Set the bowl over a pot of simmering water (double boiler method). Stir until smooth and glossy.
- Alternatively, melt in the microwave in 20-second bursts, stirring each time until smooth.
- Let cool slightly before adding to the egg mixture.
Step 2: Prepare the Egg Mixture
- In a blender, combine the egg, allulose, monk fruit extract, vanilla, and pinch of salt.
- Blend on medium speed until smooth, slightly frothy, and pale.
Step 3: Incorporate the Chocolate
- With the blender running on low, slowly drizzle in the melted chocolate.
- Blend until fully incorporated, creating a silky, thick base.
Step 4: Whip the Cream
- In a chilled mixing bowl, whip ¾ cup heavy cream until stiff peaks form.
- Be careful not to over-whip, or the cream may turn grainy.
Step 5: Fold Gently
- Transfer the chocolate mixture to a large bowl.
- Using a spatula, fold in the whipped cream in small batches.
- The goal is to combine without deflating the airy texture.
Step 6: Chill
- Spoon the mousse into ramekins, glasses, or dessert cups.
- Cover with plastic wrap and refrigerate for at least 2 hours (overnight is even better).
Step 7: Garnish and Enjoy
- Just before serving, top with whipped cream, chocolate curls, or fresh berries.
Variations to Try
One of the joys of mousse is its versatility. Here are a few creative variations you can experiment with:
- Mocha Mousse
Add 1 tablespoon of instant espresso or strong coffee to the egg mixture for a coffee-chocolate flavor. - Mint Chocolate Mousse
Replace vanilla extract with ½ teaspoon of peppermint extract for a refreshing twist. - Spiced Chocolate Mousse
Stir in a pinch of cinnamon, nutmeg, or chili powder for a warm or spicy kick. - Coconut Cream Mousse
Swap heavy cream with chilled coconut cream for a dairy-free alternative. - Layered Parfait
Alternate layers of mousse with whipped cream, crushed keto cookies, or toasted nuts in a glass for a stunning presentation. - Orange Chocolate Mousse
Add ½ teaspoon of orange zest for a citrusy, sophisticated twist.
Serving Suggestions
While mousse is perfect on its own, you can make it even more special with thoughtful presentation:
- Serve in stemmed glasses or martini cups for a restaurant-style touch.
- Top with sugar-free chocolate shavings or a light dusting of cocoa powder.
- Pair with fresh berries for a pop of color and natural sweetness.
- Garnish with a sprig of mint for freshness.
- Create a mousse bar for parties, where guests can top their servings with nuts, berries, or whipped cream.
Storage and Make-Ahead Tips
- Refrigeration: Store mousse in an airtight container or covered glasses in the refrigerator for up to 3 days.
- Freezing: Not recommended, as the texture can separate when thawed.
- Make-Ahead: Perfect for entertaining, as it can be made 1–2 days before serving.
Nutritional Information (Per Serving, 6 servings)
- Calories: ~220
- Fat: 21 g
- Protein: 4 g
- Net Carbs: 3 g
- Fiber: 2 g
- Total Carbs: 5 g
(Exact values vary depending on brands of chocolate and cream used.)
Troubleshooting Tips
- Mousse Too Runny?
Chill longer or check that you whipped the cream to stiff peaks. - Mousse Too Thick or Heavy?
Fold the cream more gently, or whip slightly less for a lighter texture. - Grainy Texture?
The chocolate may have cooled too much before blending. Ensure it’s warm but not hot when added. - Too Sweet / Not Sweet Enough?
Adjust the amount of sweetener to match your taste preference.
FAQs
1. Can I make this mousse dairy-free?
Yes! Replace heavy cream with coconut cream and ensure your chocolate is dairy-free.
2. Can I skip the egg?
You can, but the mousse will be denser and less airy. Try replacing it with 2 tablespoons of unsweetened almond milk or aquafaba (chickpea brine) for a vegan-friendly option.
3. Is this recipe safe for children?
Yes, especially if pasteurized eggs are used. You may want to reduce the chocolate’s intensity for younger palates.
4. Can I make this ahead for guests?
Absolutely! This mousse tastes even better after resting overnight in the fridge.
5. Is it gluten-free?
Yes, this mousse is naturally gluten-free.
6. Can I use cocoa powder instead of chocolate?
You can, but the flavor won’t be as rich or authentic. Real chocolate provides superior depth.
7. Can I use erythritol instead of allulose?
Yes, but erythritol may cause slight crystallization. Allulose is recommended for the smoothest texture.
8. How can I make it even more decadent?
Top with a drizzle of melted sugar-free chocolate, sea salt flakes, or keto caramel sauce.
The History of Chocolate Mousse
Mousse originated in France, where the word mousse means “foam.” French chefs perfected the art of creating light yet structured dishes by incorporating whipped cream or beaten egg whites. Chocolate mousse, in particular, gained popularity in the late 19th century as chocolate became more widely available in Europe.
This keto-friendly version stays true to the original’s spirit while updating it for modern dietary needs. It proves that indulgence and health-conscious eating don’t have to be opposites.
Why Keto Chocolate Desserts Work So Well
Chocolate and keto may seem like an unlikely pair, but they’re a surprisingly natural fit. Here’s why:
- High Fat Content: Keto emphasizes healthy fats, and chocolate (especially dark, unsweetened varieties) provides plenty of them.
- Low Sugar Options: With natural sweeteners like monk fruit and allulose, you can enjoy the taste of chocolate without the carbs.
- Satisfying Richness: Chocolate’s flavor is naturally intense, so a little goes a long way in satisfying cravings.
This mousse is an excellent example of how the keto diet doesn’t require giving up your favorite desserts.
Expert Tips for Perfect Keto Chocolate Mousse
- Use Room-Temperature Ingredients: Cold eggs or chocolate can cause curdling or clumping.
- Chill Your Bowl and Whisk: When whipping cream, chilling equipment ensures faster, more stable peaks.
- Taste and Adjust: Sweetness varies depending on chocolate brand and personal preference. Always taste before chilling.
- Presentation Matters: A simple garnish transforms this dessert from homemade to elegant.
Conclusion: A Dessert Worth Making Again and Again
Keto Chocolate Mousse is proof that you don’t have to sacrifice flavor for health. With its silky texture, bold chocolate taste, and customizable variations, it’s a dessert that feels indulgent yet aligns with your low-carb lifestyle.
Whether you’re making it for a special dinner, a festive occasion, or a quiet evening treat, this recipe guarantees smiles and satisfaction. The best part? It’s easy enough for beginners yet impressive enough for guests.