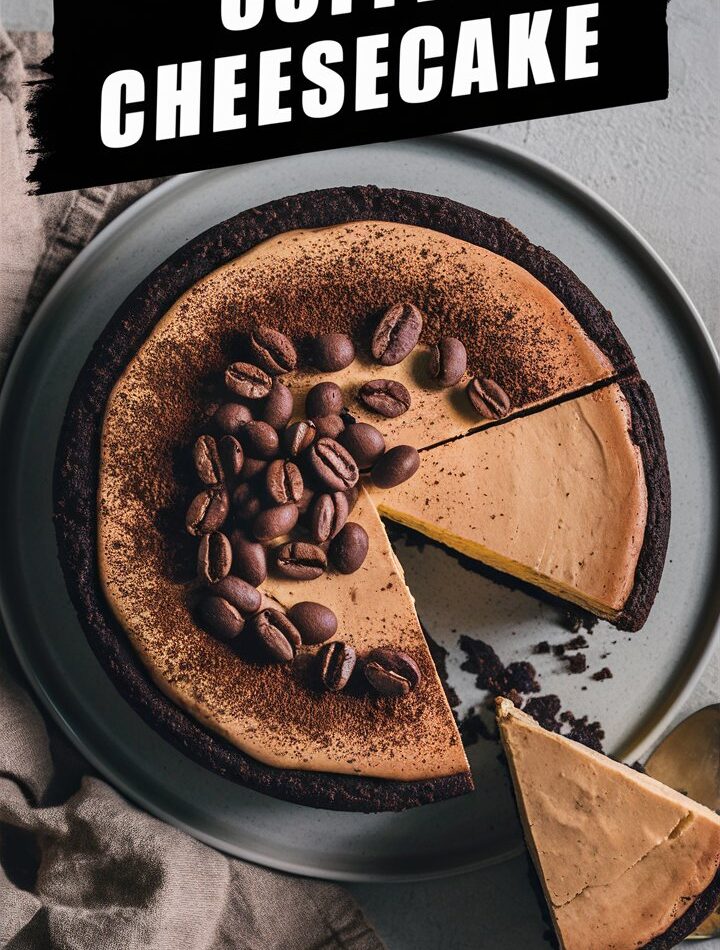
Coffee and cheesecake—two indulgences loved around the world. When combined, they create a dessert that’s luxurious, bold, and unforgettable. Coffee Cheesecake isn’t just another sweet treat—it’s a sophisticated fusion of flavors, where the slightly bitter notes of coffee enhance the creamy sweetness of cheesecake.
Whether you’re planning a festive dinner party, surprising guests with something gourmet, or simply treating yourself after a long day, this dessert never fails to impress. It’s indulgent yet approachable, elegant yet simple to make at home.
In this ultimate guide, you’ll learn everything you need to know about baking the perfect Coffee Cheesecake—from detailed ingredients and step-by-step instructions to expert tips, troubleshooting, creative variations, and serving ideas. By the end, you’ll be ready to bake a cheesecake that rivals the best patisseries.
Why You’ll Love This Coffee Cheesecake
- Rich but Balanced Flavor – The bitterness of coffee cuts through the sweetness, making every bite perfectly balanced.
- Velvety Texture – Smooth, creamy, and melt-in-your-mouth cheesecake with just the right density.
- Looks Fancy, Tastes Amazing – Effortlessly elegant presentation without complicated techniques.
- Make-Ahead Friendly – Cheesecake always tastes better after chilling, which makes this recipe perfect for parties and holidays.
- Highly Customizable – Can be turned into mocha cheesecake, tiramisu cheesecake, or even a no-bake version.
Ingredients for Coffee Cheesecake
For the Crust
- 2 cups (200g) graham cracker crumbs (or digestive biscuits)
- ½ cup (115g) unsalted butter, melted
- ¼ cup (50g) granulated sugar
For the Filling
- 32 oz (900g) full-fat cream cheese, softened
- 1 cup (200g) granulated sugar
- 4 large eggs, room temperature
- 1 cup (240g) sour cream (or Greek yogurt for a tangier profile)
- 1 tsp pure vanilla extract
- 2 tbsp instant espresso powder (or ½ cup strong brewed coffee, reduced)
- ¼ cup (60ml) heavy cream (optional, for richer texture)
For the Topping (Optional)
- Freshly whipped cream
- Cocoa powder or chocolate shavings
- Whole espresso beans for garnish
Step-by-Step Directions
1. Make the Crust
- Preheat oven to 325°F (163°C).
- Combine graham cracker crumbs, melted butter, and sugar until sandy.
- Press mixture firmly into the bottom of a 9-inch springform pan.
- Bake for 10 minutes, then let cool.
2. Prepare the Filling
- In a large mixing bowl, beat cream cheese until smooth and creamy (2–3 minutes).
- Gradually add sugar, mixing until lump-free.
- Add eggs one at a time, mixing slowly to prevent overbeating.
- Stir in sour cream, vanilla extract, and espresso powder.
- Fold in heavy cream for extra richness.
3. Bake with a Water Bath
- Pour filling over the crust and smooth the top.
- Place pan in a larger roasting pan and pour hot water halfway up the sides.
- Bake for 50–60 minutes—edges should be set, and center should jiggle slightly.
- Turn off oven, leave door slightly open, and let cheesecake rest for 1 hour.
4. Chill & Serve
- Refrigerate for at least 4 hours, preferably overnight.
- Remove from springform pan, top with whipped cream, cocoa, or chocolate shavings.
- Slice with a warm knife for clean edges.
Pro Baker’s Tips for Success
- Use room temperature ingredients – Cold cream cheese creates lumps.
- Don’t overmix – Too much air causes cracks.
- Always use a water bath – It keeps texture creamy and prevents surface cracks.
- Cool slowly – Rapid temperature change is the #1 cause of cracks.
- Chill overnight – The flavor deepens and texture improves dramatically.
Variations of Coffee Cheesecake
- Mocha Cheesecake – Add ½ cup melted dark chocolate to the batter for a chocolate-coffee combo.
- Tiramisu Cheesecake – Top with ladyfingers and dust with cocoa powder.
- Caramel Latte Cheesecake – Swirl caramel sauce into the batter before baking.
- No-Bake Coffee Cheesecake – Use gelatin for setting instead of baking.
- Coffee & Biscotti Crust – Swap graham crackers for crushed biscotti for a nutty twist.
Serving Suggestions
- Pair with espresso or cappuccino for an intensified flavor experience.
- Drizzle with chocolate ganache or caramel sauce.
- Garnish with toasted nuts, biscotti crumbs, or chocolate-covered espresso beans.
- For special occasions, serve with fresh berries and whipped cream.
Storage and Freezing
- Refrigerator: Store covered for up to 5 days.
- Freezer: Wrap tightly in plastic wrap and foil, freeze for up to 2 months. Thaw overnight in the fridge.
- Tip: Freeze individual slices for easy portion control.
Troubleshooting Common Issues
- Cracks on Top – Caused by overmixing or baking without a water bath.
- Soggy Crust – Ensure crust is pre-baked and pan is tightly wrapped in foil.
- Dense Texture – Overbaking or overmixing leads to heaviness.
- Undercooked Center – Center should jiggle slightly; it will set during chilling.
FAQs
Can I use instant coffee instead of espresso powder?
Yes, but espresso powder is more concentrated and delivers stronger flavor.
Can I make it dairy-free?
Yes, substitute with plant-based cream cheese and coconut cream, though texture will differ.
What pan is best?
A springform pan works best for easy removal.
Do I need to use a water bath?
Highly recommended—it ensures creaminess and prevents cracks.
Can I add alcohol?
Yes! Coffee liqueurs like Kahlúa add depth and richness.
Nutritional Information (Per Slice – Approximate)
- Calories: 420
- Fat: 30g
- Carbohydrates: 32g
- Protein: 7g
- Sugar: 25g
Conclusion
Coffee Cheesecake is more than just a dessert—it’s an experience. With its velvety texture, rich flavor, and coffee-kissed aroma, it’s a treat that satisfies both cheesecake lovers and coffee enthusiasts alike. By following the tips, tricks, and variations in this guide, you’ll have a dessert that looks professional, tastes heavenly, and impresses every time.