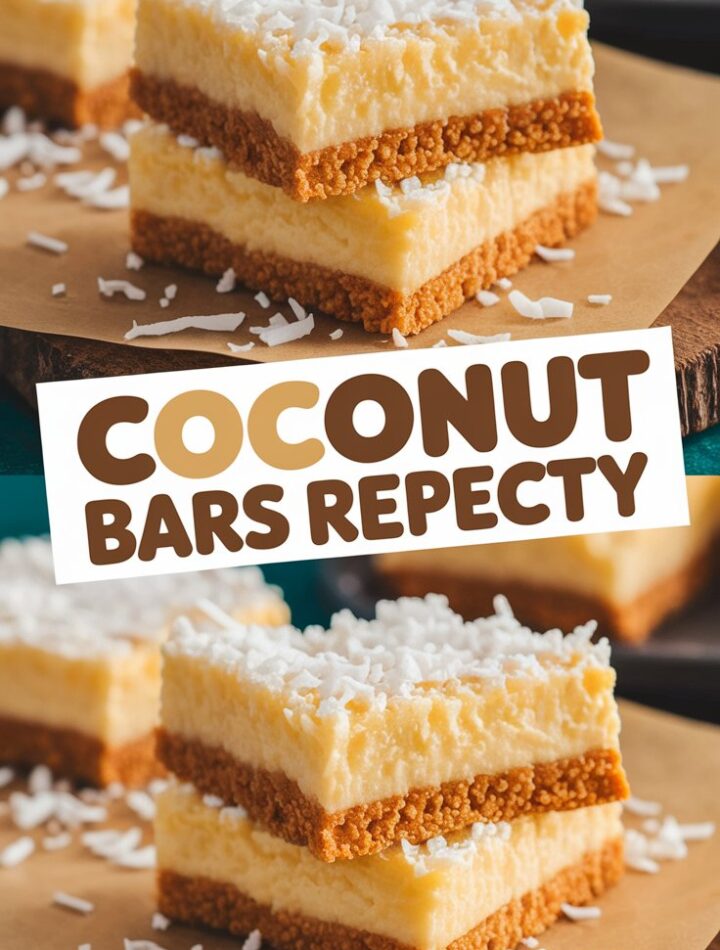
If you love the taste of coconut, you’re going to fall head over heels for these chewy, buttery Coconut Bars. They’re soft in the center, golden on the edges, and bursting with coconut flavor in every bite. The best part? They’re ridiculously easy to make — no fancy equipment, no complicated steps — just pure, homemade goodness that tastes like a tropical vacation baked into dessert form.
This complete guide will show you how to make Coconut Bars from scratch, plus give you baking tips, variations, FAQs, storage hacks, and pro secrets to help your bars turn out perfectly every single time. Whether you’re baking for family, friends, or simply to satisfy your own sweet craving, this recipe is bound to become one of your all-time favorites.
🌴 What Are Coconut Bars?
Coconut Bars are simple baked dessert squares made from a combination of butter, sugar, flour, eggs, and shredded coconut. The mixture bakes into a dense, chewy bar with slightly crisp edges and a rich, sweet coconut flavor. They’re sometimes called Coconut Squares, Coconut Blondies, or Coconut Dessert Bars.
Unlike cookies, which are portioned before baking, these bars are baked in a single pan and then cut into squares — making them ideal for parties, bake sales, picnics, or a quick afternoon treat. The beauty of Coconut Bars lies in their texture: soft and moist on the inside, delicately golden on the outside, with that irresistible chewiness that only coconut can bring.
💖 Why You’ll Love This Coconut Bars Recipe
There are hundreds of dessert bar recipes out there, but these Coconut Bars stand out for several reasons:
- Effortless to make – You don’t need a mixer or any special tools. Just one bowl, a whisk, and a baking pan.
- Incredible texture – Chewy in the center, crisp on the edges, and rich with buttery coconut flavor.
- Customizable – Add chocolate chips, lemon zest, almonds, or drizzle melted chocolate on top.
- Family-friendly – Perfect for lunch boxes, potlucks, tea parties, and after-school snacks.
- Freezer-friendly – Make a batch and freeze for up to two months for a ready-to-go treat anytime.
- Naturally crowd-pleasing – Even those who claim they don’t love coconut end up reaching for seconds!
🧈 Ingredients You’ll Need
You’ll find everything you need for these bars in your pantry. Each ingredient plays a role in achieving that signature chewy-buttery texture.
Basic Ingredients:
- 1 cup (225 g) unsalted butter, melted – Butter gives the bars richness and moisture.
- 1 ½ cups (300 g) granulated sugar – Adds sweetness and helps create a golden crust.
- 2 large eggs – Provide structure and help the bars hold together.
- 1 teaspoon vanilla extract – Balances the flavor and enhances the coconut aroma.
- 2 cups (250 g) all-purpose flour – The base of the bars, providing body and chewiness.
- 1 teaspoon baking powder – Gives a slight lift and keeps the texture soft.
- ½ teaspoon salt – Balances sweetness and enhances flavor.
- 2 ½ cups (200 g) sweetened shredded coconut – The star of the show — rich, chewy, and full of tropical flavor.
Optional Add-Ins (for variation):
- ½ cup semi-sweet chocolate chips – for chocolate coconut bars.
- ¼ cup sliced almonds or pecans – for a nutty crunch.
- 1 tablespoon lemon or lime zest – for a refreshing citrus kick.
- ¼ cup sweetened condensed milk – for extra gooey texture.
🍳 Step-by-Step Directions
Step 1: Preheat and Prepare
Preheat your oven to 350°F (175°C).
Grease or line a 9×13-inch baking pan with parchment paper. This will make removing the bars easier after baking.
Step 2: Mix the Wet Ingredients
In a large bowl, combine the melted butter and sugar. Whisk until smooth and glossy — the mixture should look slightly thick but pourable.
Add the eggs one at a time, whisking after each addition. Stir in the vanilla extract.
Step 3: Combine the Dry Ingredients
In a separate bowl, whisk together the flour, baking powder, and salt. Gradually add this dry mixture to the wet ingredients. Use a spatula to fold until just combined. Don’t overmix; overmixing can make the bars dense.
Step 4: Add the Coconut
Fold in the shredded coconut until evenly distributed. The batter will be thick and slightly sticky — that’s exactly what you want!
Step 5: Spread and Bake
Pour the batter into the prepared baking pan and spread evenly with a spatula.
Bake for 25–30 minutes, or until the top is golden brown and a toothpick inserted into the center comes out clean or with a few moist crumbs.
Step 6: Cool and Slice
Let the bars cool completely in the pan. Once cooled, lift them out using the parchment paper and transfer to a cutting board.
Use a sharp knife to cut into squares or rectangles.
Step 7: (Optional) Add Finishing Touches
For an elegant presentation, drizzle the top with melted chocolate or white chocolate, sprinkle with toasted coconut flakes, or dust lightly with powdered sugar.
🕒 Serving Size and Time Breakdown
| Step | Time |
|---|---|
| Preparation | 10 minutes |
| Baking | 25–30 minutes |
| Cooling | 20 minutes |
| Total Time | ~1 hour |
| Yield | 16–20 bars |
🌈 Flavor Variations to Try
One of the best things about this Coconut Bars recipe is its flexibility. You can twist it in countless ways to match any mood or season.
1. Chocolate Coconut Bars
Mix ½ cup chocolate chips into the batter before baking. The chocolate melts slightly and pairs beautifully with the coconut for a candy-bar-like flavor.
2. Lemon Coconut Bars
Add 1 tablespoon of fresh lemon zest and a teaspoon of lemon juice to the batter for a zesty tropical twist.
3. Coconut Almond Bars
Fold in ¼ cup sliced almonds or chopped pecans for added crunch and nutty richness.
4. Gluten-Free Coconut Bars
Use a gluten-free flour blend instead of all-purpose flour. The texture stays wonderfully chewy.
5. Coconut Caramel Drizzle
After cooling, drizzle the top with a simple homemade caramel sauce. Sprinkle with a pinch of sea salt for an irresistible sweet-salty combo.
6. White Chocolate Coconut Blondies
Add chunks of white chocolate or drizzle melted white chocolate after baking for a creamy contrast to the toasted coconut.
🥥 Pro Tips for Perfect Coconut Bars
- Measure precisely. Coconut can be fluffy and pack differently. Spoon and level for accurate measurement.
- Don’t overmix. Overworking the batter can make the bars dense. Mix just until combined.
- Cool completely before cutting. Warm bars may crumble; once cool, they slice cleanly.
- Use parchment paper. Makes removal easy and prevents sticking.
- Toast the coconut for deeper flavor — bake it at 325°F for 5–7 minutes until lightly golden before adding to the batter.
- Experiment with extracts. Swap vanilla for almond or coconut extract to intensify flavor.
- Double the batch for events. These bars disappear fast, especially at potlucks!
🧊 Storage and Freezing Instructions
Room Temperature:
Store cooled bars in an airtight container at room temperature for up to 5 days. Place parchment between layers to prevent sticking.
Refrigeration:
You can refrigerate Coconut Bars for up to 7 days, but bring them to room temperature before serving for the best texture.
Freezing:
Wrap individual bars in plastic wrap and store in a freezer-safe bag or container. They’ll keep well for 2 months.
To serve, thaw at room temperature or warm in the microwave for 10–15 seconds for that fresh-baked feel.
🍫 Serving Ideas
- Serve Coconut Bars warm with a scoop of vanilla or coconut ice cream.
- Pair them with coffee or tea for an afternoon snack.
- Add them to dessert platters with brownies, lemon bars, or blondies.
- Drizzle with melted chocolate or top with a spoonful of whipped cream for a more indulgent treat.
- Wrap individually and gift them — they make wonderful homemade presents!
🧠 Nutrition Information (Per Serving, Approximate)
| Nutrient | Amount |
|---|---|
| Calories | 230 |
| Total Fat | 12 g |
| Saturated Fat | 8 g |
| Cholesterol | 35 mg |
| Sodium | 85 mg |
| Carbohydrates | 28 g |
| Fiber | 1 g |
| Sugars | 18 g |
| Protein | 3 g |
(Nutrition may vary based on specific ingredients and portion size.)
💬 Frequently Asked Questions
1. Can I use unsweetened coconut instead of sweetened?
Yes, but your bars will be less sweet. You can compensate by adding 2–3 extra tablespoons of sugar.
2. Can I make these bars ahead of time?
Absolutely. Bake and store them at room temperature for up to 3 days before serving. They stay chewy and fresh.
3. How do I know when they’re done baking?
When the top turns a light golden brown and the center looks set, they’re ready. A toothpick inserted in the center should come out mostly clean.
4. Can I substitute margarine for butter?
You can, but butter provides a richer flavor and better texture.
5. Can I make these bars dairy-free?
Yes! Use dairy-free butter and coconut-based condensed milk alternatives.
6. What type of coconut works best?
Sweetened shredded coconut gives the best texture and flavor, but flaked coconut works if that’s what you have.
7. Can I freeze baked Coconut Bars?
Definitely. Wrap well and freeze up to 2 months. Thaw before serving or warm slightly in the microwave.
8. Can I use brown sugar instead of white?
Yes — brown sugar adds a hint of caramel flavor and makes the bars slightly denser and more moist.
9. Why are my bars too dry?
They may have baked too long. Remove them as soon as the edges are golden and the center looks set.
10. Can I add frosting?
A simple glaze made from powdered sugar and milk or a drizzle of chocolate makes them extra special, but they’re delicious plain too.
🧁 Common Mistakes to Avoid
- Skipping parchment paper – The bars may stick, making them hard to remove.
- Overbaking – Coconut browns fast, so keep an eye near the end of bake time.
- Using cold butter – Melted butter blends better and gives the bars a fudgy texture.
- Cutting too early – Let them cool to firm up before slicing.
- Forgetting salt – A pinch of salt balances all the sweetness.
🥄 How to Make Coconut Bars Look Bakery-Perfect
- Cut neatly: Use a hot knife (dip in hot water and wipe dry) for clean edges.
- Add garnish: Sprinkle extra coconut or drizzle chocolate for a professional finish.
- Serve on parchment squares: Makes them look rustic and inviting.
- Add contrast: Serve with dark chocolate curls or berries for color.
🌟 The Story Behind This Recipe
Every baker has that one recipe that becomes a family classic — this Coconut Bars Recipe is mine. I created it after experimenting with a simple coconut macaroon mix, trying to make something a little more substantial and chewy. After several tweaks (and taste tests from friends and neighbors), this final version became the most requested treat in my kitchen.
The secret? Using melted butter instead of softened — it makes the bars rich and almost caramel-like on the edges. And the combination of vanilla and coconut gives that bakery-style aroma that fills your kitchen while baking.
Now, these bars appear at nearly every family get-together, from birthdays to barbecues. It’s amazing how something so simple can bring so much joy — proof that good desserts don’t need to be complicated.
📦 How to Package and Gift Coconut Bars
If you want to share these Coconut Bars, here’s how to make them look as good as they taste:
- Wrap each bar individually in wax paper or parchment.
- Stack them in a small bakery box and tie with ribbon.
- Add a handwritten label — “Homemade Coconut Bars – Made with Love.”
- They make thoughtful gifts for teachers, friends, or holiday exchanges.
🔗 Related Recipes You’ll Love
If you enjoy this recipe, try these next:
- Coconut Pineapple Banana Bread – soft, moist, and tropical.
- Cherry Coconut Lamingtons – fluffy sponge cakes coated in coconut.
- Vanilla Pistachio Loaf with Pistachio Frosting – elegant and nutty.
- Coconut Cream Cheesecake Bars – creamy and indulgent.
- Coconut Macaroons – crisp outside, chewy inside, and gluten-free.
💭 Final Thoughts
These Coconut Bars are proof that the simplest recipes often bring the most joy. With their chewy texture, golden edges, and rich coconut flavor, they’re the kind of dessert you’ll want to make again and again. They taste amazing fresh out of the oven, even better the next day, and freeze beautifully — making them perfect for any occasion.
So next time you crave something sweet, skip the store-bought treats and make a batch of these homemade Coconut Bars instead. They’re nostalgic, comforting, and absolutely irresistible.