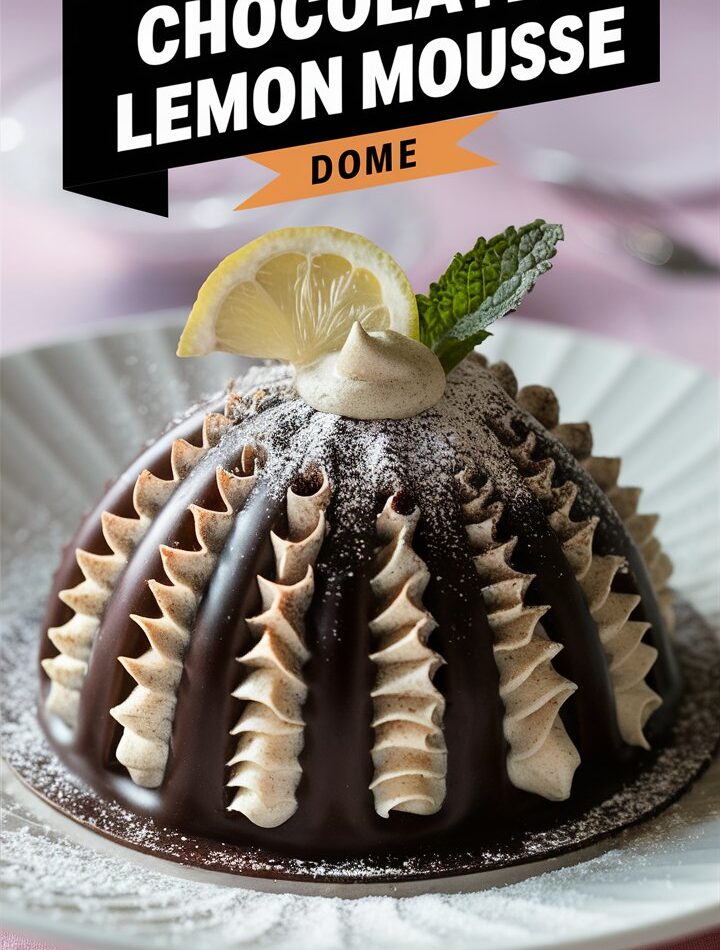
There are desserts that are simply delicious, and then there are desserts that leave an unforgettable impression. The Chocolate Lemon Mousse Dome belongs firmly in the second category. Imagine cracking into a glossy, velvety chocolate shell, only to reveal a cloud-like lemon mousse inside — smooth, creamy, and tangy enough to balance the chocolate’s richness. It’s the kind of dessert that makes guests think you’ve hired a professional pastry chef.
But here’s the secret — while it looks like a work of culinary art, with the right guidance, you can create this showstopper in your own kitchen.
This article will walk you through everything you need to know — from choosing the right chocolate to perfecting the mousse texture, from assembly tricks to storage solutions, and even creative flavor variations that could make this recipe your signature dessert.
Why Chocolate and Lemon Work Together
Chocolate and citrus might not seem like the most obvious pairing, but when done right, they create one of the most sophisticated flavor profiles in the dessert world.
- Dark chocolate brings an intense, slightly bitter richness.
- Lemon adds brightness, freshness, and tang.
- Together, they form a contrast that wakes up your taste buds and keeps each bite interesting.
The chocolate shell also brings texture — that satisfying “snap” as your spoon cracks into it, giving way to airy mousse inside. It’s a textural and flavor balance that makes this dessert irresistible.
Ingredients – Choosing the Best for Perfect Results
The quality of your ingredients will directly affect the flavor and texture of your Chocolate Lemon Mousse Dome. Here’s what you’ll need, along with expert notes for the best choices:
For the Chocolate Shell
- Dark chocolate (70% cocoa) – High cocoa content gives a rich, deep flavor. Choose a couverture chocolate for a smoother finish and easier tempering.
- Unsalted butter (optional) – A small amount can soften the chocolate’s snap for easier eating.
For the Lemon Mousse
- Heavy cream – Whipped cream is the foundation of mousse texture. Use cream with at least 35% fat.
- Egg yolks – Provide richness and help the mousse set.
- Granulated sugar – Sweetens the mousse and balances lemon’s acidity.
- Fresh lemon juice – Freshly squeezed only; bottled juice won’t give the same brightness.
- Lemon zest – Adds an aromatic citrus oil that deepens flavor.
- Gelatin sheets or powder (optional) – Helps stabilize the mousse for clean slices.
- Cold water – For blooming gelatin.
Essential Kitchen Tools
To make this dessert successfully, certain tools will make the process much smoother:
- Silicone dome molds (semi-sphere, 3–4 inches wide)
- Double boiler or heatproof bowl over a pot
- Whisk and electric mixer
- Rubber spatula
- Microplane or fine grater (for zest)
- Digital kitchen scale (for precision)
- Piping bag (optional, for neat filling)
Step-by-Step Recipe Instructions
1. Preparing the Chocolate Shell
- Melt the chocolate – Use a double boiler or microwave in 15-second bursts, stirring in between. Avoid overheating.
- Coat the molds – Pour melted chocolate into each dome mold, swirling to fully cover. Turn the mold upside down to drip off excess.
- Chill until set – Freeze for 10–15 minutes or refrigerate until firm.
- Apply a second coat (optional) – For a thicker, more durable shell.
Pro Tip: Tempering chocolate (heating and cooling in a controlled way) ensures a glossy finish and a crisp snap.
2. Making the Lemon Mousse
- Whip the cream – Beat heavy cream until soft peaks form; chill until needed.
- Make the lemon base – In a heatproof bowl, whisk egg yolks and sugar until pale.
- Add lemon flavor – Whisk in lemon juice and zest.
- Heat gently – Place over simmering water, stirring until thickened (like custard).
- Add gelatin (if using) – Bloom gelatin in cold water, then stir into the warm mixture.
- Cool to room temperature – Avoid adding whipped cream to a hot base, or it will deflate.
- Fold in whipped cream – Use a spatula to gently combine, keeping the mousse light.
3. Assembling the Domes
- Ensure chocolate shells are fully set.
- Spoon or pipe mousse into each dome, leaving a small gap at the top.
- Cover and freeze for at least 2–3 hours, or overnight for easier unmolding.
4. Finishing and Decorating
- Gently release domes from molds by pressing the silicone outward.
- Place on a serving plate.
- Decorate with:
- White chocolate drizzle
- Candied lemon slices
- Fresh mint leaves
- Edible gold leaf for a luxury touch
Make-Ahead and Storage Tips
- Make-Ahead: Assemble domes up to 3 days before serving. Store in the freezer.
- Serving: Remove from freezer 15 minutes before eating for the perfect texture.
- Storage: Keep in an airtight container to avoid freezer burn.
Flavor Variations
- Lemon-Berry Dome – Add a layer of raspberry compote inside before sealing.
- Tropical Citrus Dome – Use lime or passion fruit instead of lemon.
- White Chocolate Shell – Sweeter and pairs beautifully with sharp citrus.
- Chocolate-Orange Mousse – Swap lemon for orange for a classic pairing.
Troubleshooting
- Chocolate shell cracking? Shell too thin or unmolded too soon. Use two coats.
- Mousse too runny? Overwhipped cream or skipped chilling step.
- Dull chocolate finish? Chocolate not tempered properly.
Serving Ideas
- Place dome on a plate with a drizzle of berry coulis.
- Add crushed pistachios for color and crunch.
- Serve with espresso for a sophisticated end to a meal.
Nutritional Information (per serving)
- Calories: ~350 kcal
- Protein: 5 g
- Fat: 24 g
- Carbs: 28 g
- Sugar: 25 g
Conclusion
The Chocolate Lemon Mousse Dome is not just dessert — it’s an experience. The crack of the chocolate shell, the creamy mousse, the perfect harmony of sweet and tart — all combine to make a dessert worthy of a fine dining menu. With this guide, you now have the techniques, tips, and confidence to create this stunning treat at home.