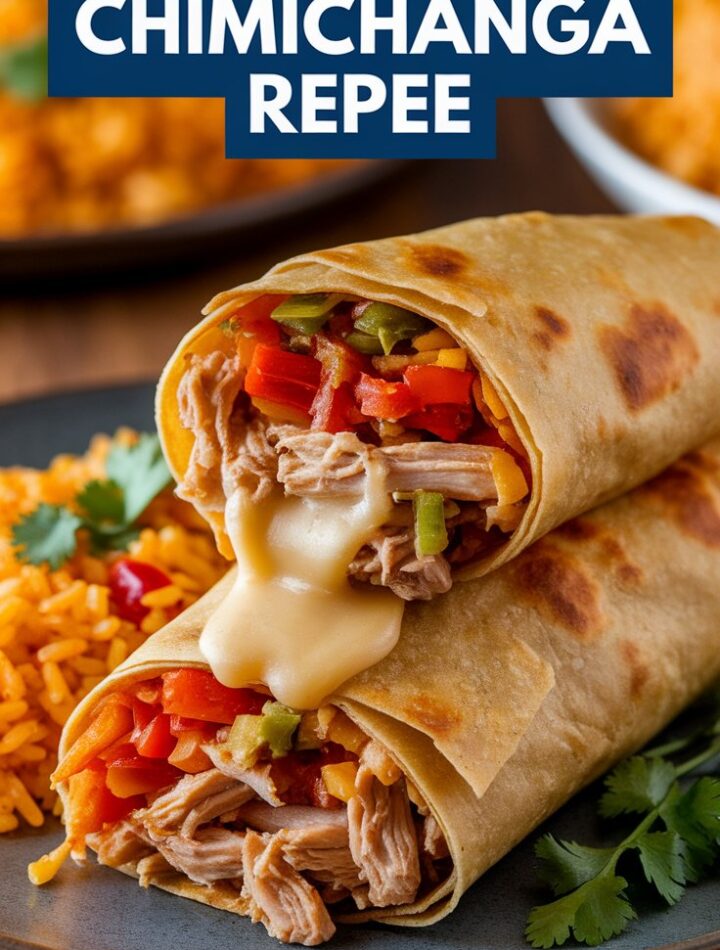
If you’ve ever craved the irresistible crunch of a golden-fried tortilla stuffed with flavorful chicken and melted cheese, you’ve probably dreamed of chimichangas. These Tex-Mex favorites deliver everything people love about burritos but with a crispy, indulgent twist. The best part? You don’t need to spend hours in the kitchen to enjoy them. With this easy 30-minute chicken chimichanga recipe, you’ll have a restaurant-quality dish on the table in no time.
This guide is more than just a recipe—it’s a full breakdown of what makes chimichangas special, how to cook them perfectly, creative variations to try, storage and reheating tips, and answers to the most common questions home cooks ask. By the end, you’ll feel confident enough to whip up chimichangas not only for dinner tonight but also for parties, family gatherings, and even freezer meal prep.
🌮 What is a Chimichanga?
Before diving into the cooking process, let’s take a moment to understand what a chimichanga actually is.
A chimichanga is essentially a deep-fried burrito. It starts with a large flour tortilla filled with a savory mixture—typically shredded meat, beans, cheese, and spices—then rolled tightly and fried until golden and crispy. The result is a crunchy shell encasing a rich, melty, flavorful filling.
Though its exact origin is debated, chimichangas are widely considered a Tex-Mex creation—a blend of Mexican flavors and American cooking methods. Some say they were invented by accident when a burrito slipped into a deep fryer. Others believe they were intentionally created in Arizona restaurants during the 20th century. Regardless of how they began, chimichangas quickly gained popularity across the United States as a hearty comfort food.
⭐ Why You’ll Love This 30-Minute Chicken Chimichanga Recipe
There are plenty of reasons to fall in love with this recipe:
- Fast & Easy: With pre-cooked chicken, dinner is ready in just 30 minutes.
- Family-Friendly: Both kids and adults love the crispy texture and cheesy filling.
- Customizable: Adjust the spice level, swap proteins, or add veggies to suit your taste.
- Restaurant-Quality at Home: Crispy, golden, and flavorful—without needing to order takeout.
- Versatile: Works for weeknight dinners, casual parties, or even meal prep.
🛒 Ingredients You’ll Need
Let’s take a closer look at the simple, pantry-friendly ingredients that bring this dish together.
Essential Ingredients:
- Shredded Cooked Chicken – Rotisserie chicken or leftover roasted chicken works perfectly. It saves time while adding deep flavor.
- Large Flour Tortillas – Soft, pliable tortillas are key for wrapping. Go for burrito-size for best results.
- Shredded Cheese – A Mexican blend, cheddar, Monterey Jack, or pepper jack for spice. Cheese helps bind the filling and adds creaminess.
- Seasonings – Onion powder, garlic powder, chili powder, ground cumin, salt, and pepper create a bold Tex-Mex flavor profile.
- Cooking Oil – Vegetable, canola, or peanut oil are best for frying. They have high smoke points and create crispiness.
Optional Toppings & Garnishes:
- Sour cream
- Fresh salsa
- Guacamole
- Pico de gallo
- Chopped cilantro
- Shredded lettuce
- Diced tomatoes
- Jalapeños
🔪 Step-by-Step Instructions
Follow these easy steps for foolproof results:
1. Prepare the Filling
In a large bowl, combine shredded chicken, cheese, onion powder, garlic powder, chili powder, cumin, salt, and pepper. Mix until well combined.
2. Assemble the Chimichangas
- Lay out one tortilla on a flat surface.
- Spoon the chicken mixture into the center.
- Fold the sides inward, then roll tightly from bottom to top to create a burrito shape.
- Secure with toothpicks if necessary to prevent unrolling during frying.
3. Heat the Oil
- In a deep skillet, add about 1 inch of cooking oil.
- Heat over medium-high until shimmering (around 350°F / 175°C).
4. Fry the Chimichangas
- Place chimichangas seam-side down in the hot oil.
- Fry for 2–3 minutes per side, or until golden brown.
- Use tongs to transfer them to a paper towel-lined plate to drain excess oil.
5. Serve & Garnish
- Remove toothpicks before serving.
- Plate hot chimichangas and top with sour cream, salsa, guacamole, or any garnish of choice.
🍴 Alternative Cooking Methods
Not a fan of frying? Try these lighter methods:
- Baked Chimichangas: Preheat oven to 425°F (220°C). Brush assembled chimichangas with oil and bake for 20–25 minutes until golden.
- Air Fryer Chimichangas: Spray with cooking spray and cook at 375°F (190°C) for 10–12 minutes, flipping halfway through.
🌶️ Delicious Variations
This base recipe is easy to adapt:
- Vegetarian Chimichangas: Replace chicken with sautéed mushrooms, beans, or roasted veggies.
- Breakfast Chimichangas: Fill with scrambled eggs, bacon, and cheese.
- Seafood Chimichangas: Use shrimp, crab, or fish for a coastal twist.
- Spicy Chimichangas: Add jalapeños, hot sauce, or spicy salsa inside the filling.
- Low-Carb Version: Use low-carb tortillas and reduce the amount of cheese.
🥗 Best Sides to Serve with Chimichangas
Pairing chimichangas with the right sides turns dinner into a feast. Try these:
- Mexican Rice – Classic and flavorful.
- Refried Beans – Creamy and filling.
- Elote (Mexican Street Corn) – Corn on the cob with mayo, cheese, and chili powder.
- Fresh Salad – Lightens up the meal.
- Chips & Salsa – Perfect appetizer or side snack.
🧊 Storage & Reheating
- Refrigerator: Store leftovers in an airtight container for up to 3 days.
- Freezer: Wrap uncooked chimichangas tightly in foil or plastic wrap. Freeze for up to 3 months. Cook directly from frozen (add extra time).
- Reheating: Reheat in the oven at 350°F (175°C) until warmed and crispy. Avoid microwaving, which makes them soggy.
📊 Nutritional Information (Approx. per Serving)
- Calories: 420
- Protein: 25g
- Carbohydrates: 32g
- Fat: 22g
- Fiber: 3g
- Sodium: 780mg
(Exact values vary depending on toppings and tortillas used.)
❓ Frequently Asked Questions
Q: Can I use rotisserie chicken?
Yes! It saves time and adds flavor.
Q: What’s the best cheese to use?
Cheddar, Monterey Jack, or a Mexican blend work well.
Q: Can I make them gluten-free?
Yes, use gluten-free tortillas.
Q: Can chimichangas be meal-prepped?
Yes, assemble ahead and refrigerate or freeze. Fry, bake, or air fry just before serving.
Q: How do I keep chimichangas from falling apart while frying?
Roll tightly and fry seam-side down first to seal.
Q: What toppings go best?
Classic toppings include sour cream, salsa, guacamole, shredded lettuce, and jalapeños.
👨🍳 Pro Tips for Perfect Chimichangas
- Don’t overfill tortillas—too much filling makes them burst.
- Keep oil hot but not smoking (around 350°F).
- Use toothpicks to secure if needed, but always remove before serving.
- For extra flavor, season chicken before shredding.
- If baking, brush tortillas with oil for a crispier finish.
⚠️ Common Mistakes to Avoid
- Using small tortillas – They’re harder to fold and tend to leak.
- Skipping the toothpicks – Can cause filling to spill into the oil.
- Microwaving leftovers – Leads to soggy results.
- Overcrowding the pan – Drops oil temperature, making chimichangas greasy instead of crispy.
🎉 Serving Ideas
- Weeknight Dinner: Quick, easy, and satisfying.
- Game Day Snack: Cut into halves or quarters for bite-sized portions.
- Family Gatherings: Customize toppings and set up a DIY chimichanga bar.
- Kids’ Favorite: Mild seasonings with extra cheese make it kid-friendly.
📝 Conclusion
Chimichangas may look like a restaurant-only indulgence, but this easy 30-minute chicken chimichanga recipe proves that anyone can make them at home. With just a handful of ingredients and a little technique, you can serve a crispy, cheesy, flavorful Tex-Mex dish that will impress family and friends.