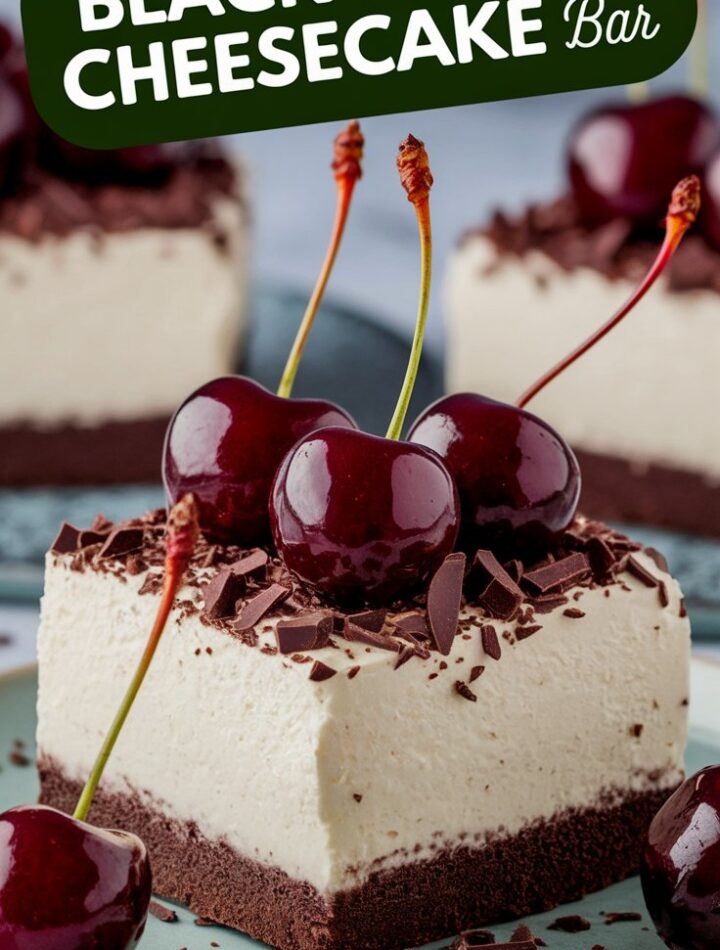
If you love desserts that are both indulgent and easy to serve, then Black Forest Cheesecake Bars are about to become your new favorite. This recipe brings together the rich creaminess of cheesecake, the deep flavor of chocolate, and the bright tang of cherries—all layered beautifully into a bar form. Unlike a traditional Black Forest cake that requires multiple layers and frosting, these bars deliver the same irresistible flavors without the fuss. They’re perfect for parties, holiday gatherings, or whenever you crave a luxurious yet simple dessert.
In this guide, we’ll dive deep into everything you need to know about making these cheesecake bars from scratch: from ingredients and techniques to storage tips, variations, FAQs, and troubleshooting advice. By the end, you’ll feel confident enough to whip up this dessert like a pro.
What Are Black Forest Cheesecake Bars?
Black Forest cake, also known as Schwarzwälder Kirschtorte, originated in Germany and has been a beloved dessert for decades. The classic version features layers of chocolate sponge cake, whipped cream, cherries, and a touch of cherry liqueur (Kirsch).
But while the cake is stunning, it can be time-consuming to make, especially if you’re not a fan of assembling and decorating multiple layers. That’s where Black Forest Cheesecake Bars come in.
Instead of a sponge cake base, these bars use a rich chocolate cookie crust. The filling is a luscious cheesecake enhanced with cocoa and studded with cherries and chocolate chunks. Everything bakes together in one pan, chills, and is then cut into neat squares or rectangles. The result? A dessert that’s just as elegant and satisfying as the cake, but far more approachable for home bakers.
Why You’ll Love This Recipe
There are countless reasons to adore these cheesecake bars, but here are a few highlights:
- Flavor Fusion: The tanginess of cheesecake balances the sweetness of chocolate and cherries perfectly.
- Simple Presentation: No need for piping bags or layer-stacking; these bars look gorgeous right out of the pan.
- Make-Ahead Friendly: Cheesecake bars taste even better after chilling overnight, making them ideal for parties.
- Portable Dessert: Unlike a whole cake, bars are easy to transport, serve, and store.
- Crowd-Pleaser: Whether at a family dinner, office potluck, or festive holiday table, these bars always impress.
Ingredients Overview
Here’s a breakdown of the key ingredients and why they matter in this recipe:
For the Crust:
- Chocolate Cookie Crumbs (1 ½ cups) – Creates a deep, chocolaty base that complements the filling. You can use Oreos (without cream) or chocolate graham crackers.
- Unsalted Butter (5 tablespoons, melted) – Binds the crumbs together and adds richness.
For the Cheesecake Filling:
- Cream Cheese (16 oz / 450g, softened) – The star of the filling, bringing tangy creaminess. Use full-fat for best texture.
- Granulated Sugar (¾ cup) – Sweetens the filling without overpowering the tang of the cream cheese.
- Eggs (2 large) – Provide structure and help set the cheesecake.
- Sour Cream (½ cup) – Adds a light tang and creamy smoothness. Greek yogurt works as a substitute.
- Vanilla Extract (1 teaspoon) – Enhances overall flavor.
- Cocoa Powder (2 tablespoons) – Introduces a subtle chocolate depth. For stronger chocolate flavor, use Dutch-processed cocoa.
For the Cherry-Chocolate Layer:
- Cherries (1 ½ cups) – Fresh, canned, or frozen (well-drained) cherries add brightness and juiciness.
- Semi-Sweet Chocolate Chips (½ cup) – Provide little bursts of chocolate in each bite.
- Cherry Pie Filling (1 ½ cups, optional) – Can be spooned on top for a glossy finish.
- Kirsch or Cherry Juice (2 tablespoons, optional) – Traditional in Black Forest desserts, adding an authentic touch.
Step-by-Step Instructions
Follow these steps carefully for perfect results:
Step 1: Prepare the Pan
Preheat your oven to 325°F (163°C). Line a 9×9-inch square baking pan with parchment paper, leaving some overhang on the sides to make removal easier.
Step 2: Make the Crust
- In a medium bowl, combine chocolate cookie crumbs with melted butter.
- Press the mixture firmly into the bottom of the prepared pan using the back of a spoon or measuring cup.
- Bake the crust for 10 minutes. Remove and let cool slightly while you prepare the filling.
Step 3: Mix the Cheesecake Filling
- In a large mixing bowl, beat the softened cream cheese and sugar until smooth and fluffy.
- Add the eggs, one at a time, mixing until just combined.
- Stir in sour cream, vanilla, and cocoa powder until the batter is creamy and lump-free.
Pro Tip: Avoid overmixing once the eggs are added—this reduces the risk of cracks during baking.
Step 4: Fold in Cherries and Chocolate
- Gently fold in cherries and chocolate chips, reserving a few for the top.
- Pour the mixture over the cooled crust and smooth the surface with a spatula.
Step 5: Add Toppings
Scatter the reserved cherries and chocolate chips on top for a visually appealing finish.
Step 6: Bake
Bake for 40–45 minutes, or until the edges are set but the center still jiggles slightly.
Step 7: Cool & Chill
- Remove from the oven and cool completely at room temperature.
- Cover the pan and refrigerate for at least 4 hours, preferably overnight.
Step 8: Slice & Serve
Use the parchment overhang to lift the cheesecake out of the pan. Slice into 16 bars with a sharp knife, wiping the blade clean between cuts for neat edges.
Variations & Creative Twists
Want to put your own spin on this recipe? Try these ideas:
- Extra Chocolatey: Add ¼ cup melted dark chocolate to the filling for richer flavor.
- Cherry Pie Layer: Spread a thin layer of cherry pie filling over the crust before adding cheesecake batter.
- Nutty Crunch: Mix chopped pecans or walnuts into the crust or filling for added texture.
- Graham Cracker Crust: Swap chocolate crumbs for graham crackers if you prefer a lighter base.
- No-Bake Option: Use a no-bake cheesecake filling and chill overnight (skip the eggs and baking step).
- Maraschino Cherries: For extra sweetness, fold in halved maraschino cherries.
- Boozy Twist: Add a tablespoon of Kirsch or cherry liqueur for adults-only indulgence.
Baking Tips & Troubleshooting
Even experienced bakers run into challenges, so here’s how to avoid common pitfalls:
- Cracks in Cheesecake: Don’t overbake; remove when the center still jiggles. Also, avoid overmixing eggs.
- Soggy Crust: Ensure cherries are well-drained before adding. Frozen cherries must be thawed and patted dry.
- Dense Texture: Use room temperature cream cheese and eggs for smooth blending.
- Uneven Slices: Chill thoroughly before cutting, and use a sharp knife wiped clean between cuts.
Storage & Freezing Guide
- Refrigerator: Store bars in an airtight container for up to 5 days.
- Freezer: Wrap bars tightly in plastic wrap, then in foil, and freeze for up to 2 months. Thaw overnight in the fridge before serving.
- Room Temperature: Cheesecake should not be left out longer than 2 hours.
Serving Suggestions
Black Forest Cheesecake Bars are versatile enough to serve in many ways:
- With Whipped Cream: Add a dollop of fresh whipped cream and chocolate shavings.
- With Ice Cream: Pair with vanilla or cherry ice cream for an indulgent dessert plate.
- On Dessert Platters: Arrange alongside brownies, cookies, and fruit for variety.
- As Holiday Treats: Decorate with edible glitter or drizzle white chocolate for a festive touch.
FAQs
1. Can I use frozen cherries?
Yes, just thaw them fully and drain well to avoid excess moisture.
2. Do I need sour cream?
Sour cream adds creaminess and tang, but Greek yogurt works as a substitute.
3. Can I make these gluten-free?
Yes, simply use gluten-free chocolate cookies for the crust.
4. Can I freeze the bars?
Absolutely. Wrap and freeze for up to 2 months, then thaw in the fridge.
5. How do I cut clean bars?
Chill fully, then use a hot knife (dip in warm water, wipe dry) for sharp edges.
6. Can I reduce sugar?
Yes, reduce by 2–3 tablespoons without affecting texture much.
7. What pan size works best?
An 8×8 or 9×9-inch pan is ideal. For thinner bars, use a 9×13 pan (reduce bake time slightly).
Healthier Alternatives & Substitutions
If you’d like to lighten things up:
- Use light cream cheese or Neufchâtel cheese.
- Replace sugar with a natural sweetener like coconut sugar or honey.
- Use dark chocolate instead of semi-sweet for added antioxidants.
- Opt for a whole-grain graham crust instead of chocolate cookies.
Common Mistakes to Avoid
- Skipping Chill Time: Bars won’t set properly if you slice too soon.
- Using Cold Cream Cheese: This leads to lumpy batter. Always soften first.
- Overbaking: Dry, cracked cheesecake is the result of leaving it in too long.
- Not Draining Cherries: Excess liquid will make the filling watery.
Conclusion
Black Forest Cheesecake Bars are a delightful way to enjoy the flavors of a classic dessert in a convenient, modern format. With their chocolate crust, creamy cheesecake filling, and juicy cherries, they’re rich, beautiful, and surprisingly easy to make. Whether you serve them at a festive holiday table, bring them to a potluck, or enjoy them as a weeknight treat, they’re guaranteed to impress.